Friday, 2024-03-15, 11:35 AM

My photoshop tutorials and writings

Main | Registration | Login
Welcome Guest
RSS
MY TUTORIALS ON OTHER SITES
  • Create a fantasy landscape matte painting with Photoshop

  • Create an abstract sci-fi scene with Photoshop

  • How to paint a woman portrait from scratch

  • Turn an ordinary photo into a fantasy one

  • How to paint a fantasy woman portrait with Photoshop

  • Create a haunted house scene with Photoshop

  • Create a sunset landscape photo manipulation

  • Forgotten Halloween-Dark photo manipulation

  • Turn a portrait into a zombie

  • Create a dark, emotional fallen angel scene

  • Create a deer abstraction with Photoshop

  • My interview

  • Create a fantasy fish scene above the sky

  • Apply two retro effects to your photos

  • Red Dream - Emotional photo manipulation

  • Create an anti-alcohol concept artwork with Photoshop

  • How to change the light and mood of your landscape photos

  • Create a photo manipulation of an emotional dancer in a forest

  • Create the wondefully colorful fantasy photo manipulation Everlasting Dream

  • Create a dark forest scene with a young witch photo manipulation

  • Retouch a model with Photoshop

  • Create the abstract photo manipulation Imperfection

  • Create a beautiful sunrise landscape photo manipulation

  • Create a dark abstract crow photo manipulation

  • Create a fantasy underwater scene with photoshop

  • Create a fashion mixed media portrait with photoshop

  • Create a surreal, emotional underground scene photo manipulation

  • Create a fantasy tree woman scene in photoshop

  • Create an intense fallen angel scene in photoshop

  • Create a fantasy fiery portrait photo manipulation

  • Create a surreal underground scene with a sleeping, frozen beauty

  • Create a winter night landscape photo manipulation

  • Create an emotional autumn scene photo manipulation

  • Create a creepy abstract flaming tree woman in photoshop

  • Create a fantasy boat scene photo manipulation

  • Create a devil woman scene using digital painting techniques

  • Create a beautiful sunrise scene with an old house

  • Create a dark grim reaper scene photo manipulation

  • Create a dark forest scene photo manipulation

  • Create a spring-inspired watercolor artwork in photoshop

  • Create a misty landscape matte painting in photoshop

  • Create a surreal head with rose photo manipulation

  • Create a fantasy photo manipulation "Summoning The Power"

  • Create a lonely child scene photo manipulation

  • Create a serene lake scene photo manipulation

  • Create a dark photo manipulation of a devil woman

  • Design a summer time vacation poster

  • Create a space battle scene in Photoshop

  • Create a garden scene with a cat gazing at a fish cloud

  • Create a beautiful mixed media portrait in photoshop

  • Create a bunny house in photoshop

  • Create a Surreal Head Of Tree Photo Manipulation

  • Create a Dark and Surreal Photo Manipulation "Volcano Spirit"

  • Create a Mysterious and Fantasy Woman Portrait in Photoshop

  • Create a Snowy Night Landscape Matte Painting

  • Create a Christmas night landscape photo manipulation

  • Create a colorful photo manipulation "Simple Life"

  • Create a fantasy forest fire scene photo manipulation

  • Create a floating superhero scene with sci-fi lighting effect

  • Create a Beautiful Abstract Cosmic Photo Manipulation

  • Create a Nature Inspired Advertisement Design

  • Create a Dark Ghostly Scene Photo Manipulation

  • Create a Fantasy Witch Scene Photo Manipulation

  • Create a fantasy halloween witch cat photo manipulation

  • Create a beautiful sunrise landscape matte painting in photoshop

  • Create a Surreal Photo Manipulation "Flooded"

  • Create a Surreal Portal Scene with Powerful Lighting effect

  • Create a Sci-fi photo manipulation "Space Station"

  • Create emotional photo manipulation "Magical Rose"

  • Create An Eerie Abstract Photo Manipulation

  • Create a Surreal Photo Manipulation Sky Gate

  • Create a Fantasy Mushroom House Photo Manipulation

  • Create a Surreal Photo Manipulation "Daydream"

  • Create a Dark Photo Manipulation "Nocturna"

  • Create an emotional sunset photo manipulation

  • Create a cat in a magical pond scene photo manipulation

  • Create a surreal photo manipulation Coffee Mind

  • Create a Fantasy floating park photo manipulation

  • Twisting Water-Surreal photo manipulation

  • Firing Heart-Emotional photo manipulation

  • Create a dramatic building explosion scene

  • Let me sink-Emotional rainy scene photo manipulation

  • Create a colorful and futuristic photo manipulation

  • The Sky Station - Surreal photo manipulation

  • The Vampire Hunter - Dark photo manipulation

  • Dark storm scene photo manipulation

  • The Released - Dark and surreal photo manipulation

  • Wounded rose - Create an abstract photo manipulation

  • Create a dark and emotional photo manipulation

  • Create a dramatic battle scene in photoshop

  • The Forgotten - Dark an conceptual photo manipulation

  • Night's butterfly-Create a dark and mysterious fantasy portrait

  • Create an anti-smoking concept design in photoshop

  • A dreamy world-Create a fantasy landscape

  • Create a dramatic action scene poster

  • Create a nature inspired, out of bound photo effect in photoshop

  • Cool metal text effect

  • Dance in blue - Fantasy photo manipulation

  • Emotional night scene - Photo manipulation

  • Create a lovely 3D like butterfly in Photoshop

  • Create a beautiful Valentine background with moon and heart

  • Create a beautiful and romantic Valentine wallpaper

  • Beautiful pink flower portrait

  • Create a beautiful spring greeting card in photoshop

  • Beautiful spring-Fantasy photo manipulation

  • Cool floral 3D text effect

  • Colorful bokeh heart effect

  • Retro artistic effects

  • Sexy ghost in the uninhabited house-Dark photo manipulation

  • Colorful and glamour composition style in photoshop

  • Glowing text in colorful fantastic space scene

  • Magical blossom dance-Fantasy photo manipulation

  • RECENT TALKS
    I am impressed with

    superbe vos tutos tr


    Nice site. On your b

    hi.
    just wond

    Helpful and easy to

    ARCHIEVES
    >


    RANDOM PHOTOS
    RECENT POSTS
    [2014-03-06]
    My first brush sets
    [2013-07-19]
    Free abstract wing and light stocks
    [2013-06-21]
    Free sci-fi grid backgrounds
    [2013-05-21]
    Free star backgrounds
    [2013-03-07]
    Create a colorful abstract cosmic photo manipulation
    MOST POPULAR
    [2010-07-26]
    Complete portrait retouching
    Views: 123102
    [2011-01-31]
    Create beautiful glowing flowers
    Views: 102434
    [2010-11-15]
    25 beautiful dreamy effect photoshop tutorials
    Views: 99149
    [2010-11-26]
    The enchanted forest- Fantasy photo manipulation
    Views: 93401
    [2012-03-07]
    Create a Nature themed, Astract photo manipulation
    Views: 86068
    [2010-08-22]
    Color blending collection I
    Views: 82237
    [2012-05-20]
    On My Road - Surreal Photo Manipulation
    Views: 79365
    [2010-03-15]
    Beautify a portrait
    Views: 71170
    [2011-06-14]
    Create a burning girl with fire effect
    Views: 68015
    [2010-09-14]
    Soft and dreamy movie effect
    Views: 65418
    MOST TALKED
    [2014-03-06]
    My first brush sets
    Opinions : 127
    [2011-01-31]
    Create beautiful glowing flowers
    Opinions : 88
    [2010-11-26]
    The enchanted forest- Fantasy photo manipulation
    Opinions : 80
    [2011-05-10]
    Chocolate skin effect
    Opinions : 61
    [2010-12-06]
    The Winter Queen - Fantasy photo manipulation
    Opinions : 44
    [2010-03-15]
    Beautify a portrait
    Opinions : 43
    [2010-12-15]
    Sweet red 3D love text effect
    Opinions : 42
    [2010-10-10]
    Create a beautiful emotional black and white love scene
    Opinions : 41
    [2010-07-06]
    Create beautiful golden skin effect using three different ways
    Opinions : 40
    [2010-08-22]
    Color blending collection I
    Opinions : 40
    RANDOM POSTS
    [2010-03-11]
    Romantic blue background
    [2010-07-30]
    Artistic dreamy effect
    [2010-08-28]
    Create a beautiful illustrated sketch effect
    [2010-01-09]
    Rainy night
    [2013-05-21]
    Free star backgrounds
    [2010-05-06]
    Create watercolor painting effect in three ways
    [2010-12-15]
    Sweet red 3D love text effect
    [2010-06-14]
    Beautiful snow color effect
    MY FAVORITE SITES
  • PSD Tutsplus
  • Webmaster tutorials
  • Typography resources
  • SEARCH
    TAGS
    Life Random thoughts angel Rain missing love Feeling My poetry Heart Nature spring color Autumn Winter My story Photoshop tutorial Photo effect Blend Photo retouch NIGHT Woman Portrait light red Blue Effect Dreamy Soft Bokeh Photo manipulation Emotional Beauty dark girl HOUSE photoshop flower drawing Fantasy Forest Snow petal Sky butterfly Surreal Hurt Blood Dream Broken fire Creepy abstract rose photo manipulation surreal planet freebie Stock Space Cosmic colorful star background Sci-Fi WING lake Pain cat magic Sunset devil UnderWater landscape Matte Painting Witch Halloween power Sun sea head garden child tree Boat grass leaves sleeping branc Crow Feather Flying Rock Mountain Goddess Castle Nebula fairy Glow Knight asteroid Waiting
    STATISTICS

    Total online: 1
    Guests: 1
    Users: 0
    Main » 2011 » October » 29 » The Mirror - Dark and horror photo manipulation


    9:03 PM
    The Mirror - Dark and horror photo manipulation
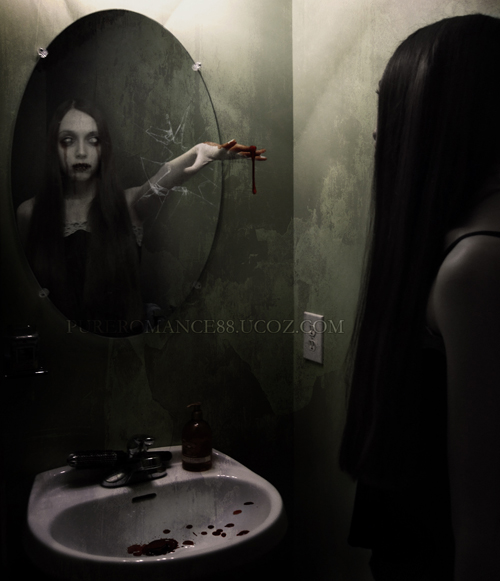
    In this tutorial i will show you how to create a dark and horror photo manipulation called "The Mirror". We will turn a girl into a zoombie, make blood, break glass, arrange elements and adjust color to generate an interestingly creepy scene.
     

    Resources:

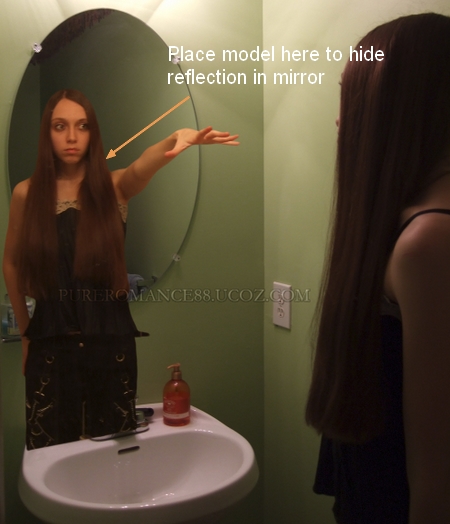
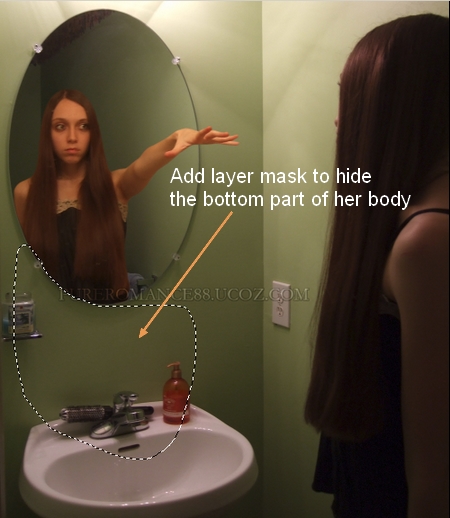
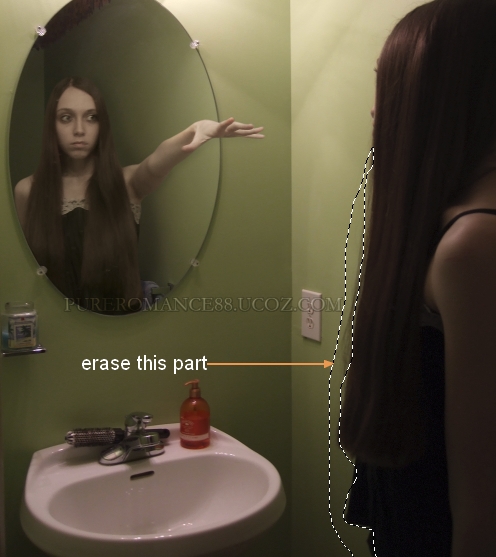
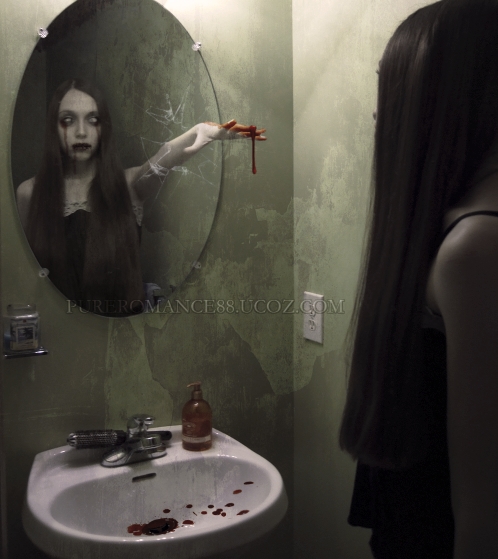
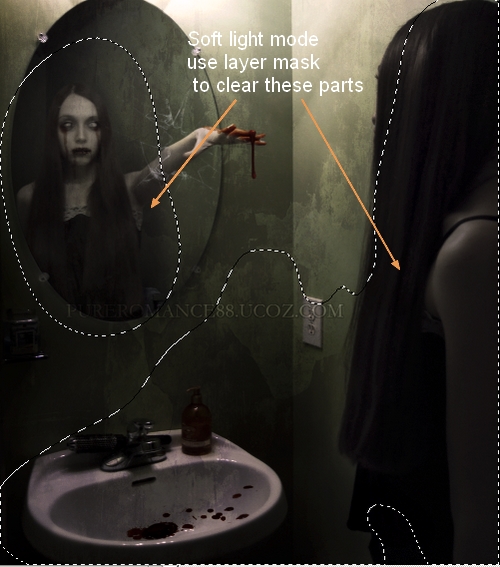
    1. Open two background with model. I crop the top of background 1 ( to make focus on mirror). Cut model from background 2 and place her at the mirror part, make sure that the size is big enough to hide completely the reflection in mirror:


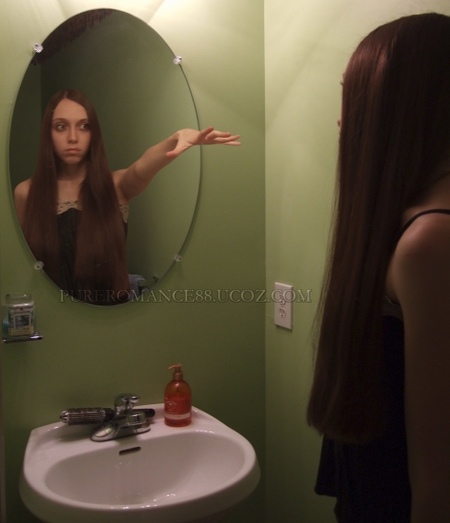
    Add layer mask to clear the part outside mirror and get the look that she is really inside mirror:


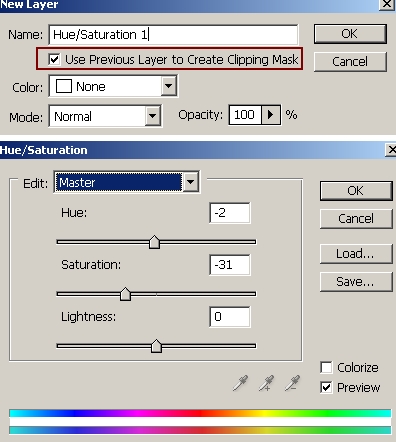
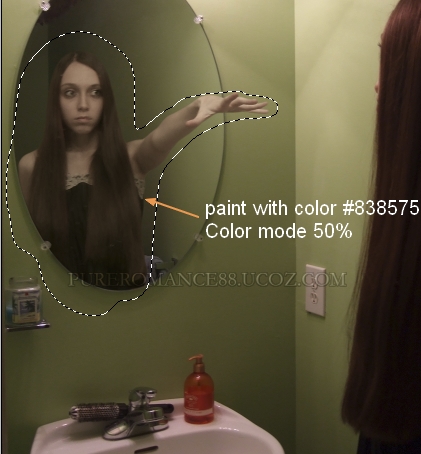
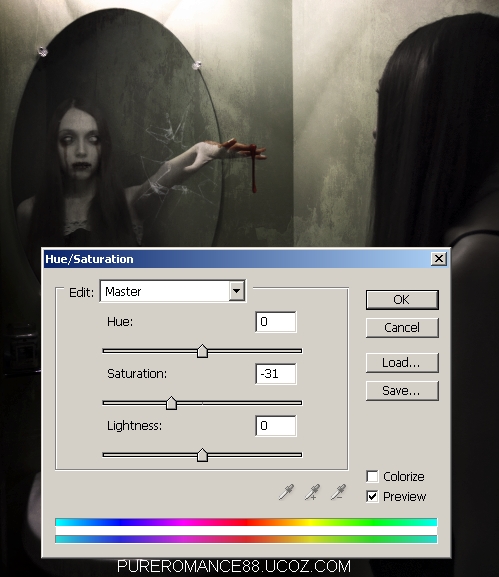
    2. The model in mirror looks so saturated agaisnt the background so i use a Hue/Saturation layer with Clipping Mask to fix it:


    I use a new layer with Clipping Mask and brush with color #838575 painting on model. Change the mode to Color 50%:


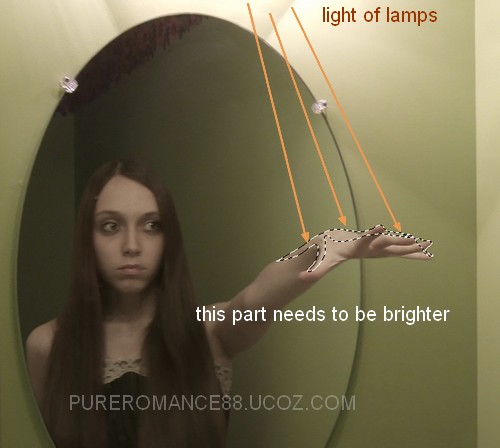
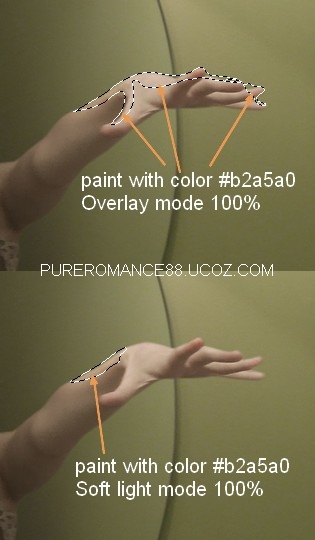
    3. As you see, the light of lamp comes from above, so a part of model arm which catch this light must be brighter than the rest. 
    Make two news layer with Clipping Mask, i use brush with color #b2a5a0  painting on this part, then change the mode to Overlay 100% and Soft light 100%:


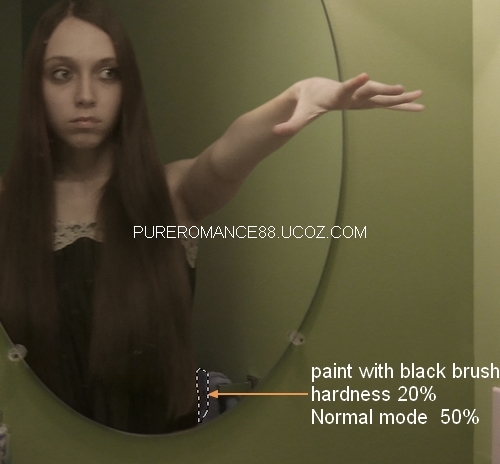
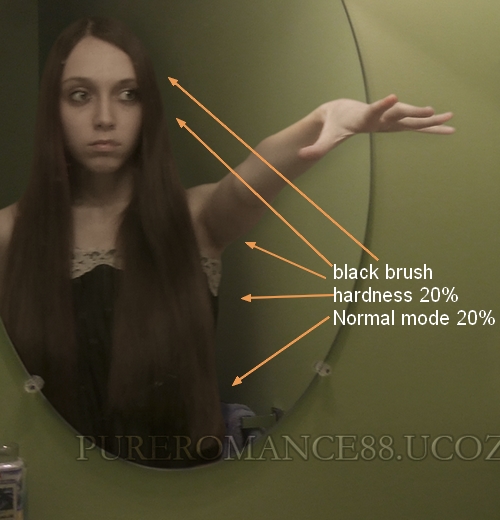
    4. Now we will make shadow for model in mirror. First i make a new layer under this model layer. Use black brush, hardness about 20% painting on the bath towel to make shadow of model on it, lower opacity to 50%:

    Then use another layer ( under model layer) and black brush, continue painting on the wall part inside mirror. Lower opacity to 20%:


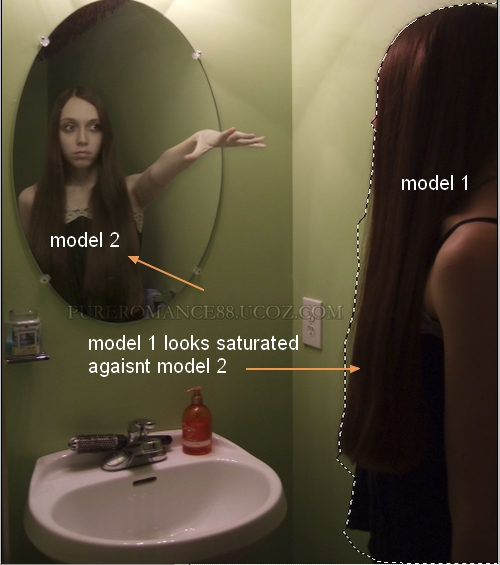
    5. Now we see model in the right ( model in background 1) looks a bit saturated agaisnt model in mirror. So i duplicate background and make a selection for this model ( we will call her model 1), copy it into a new layer. You don't need to be so precise with the selection.


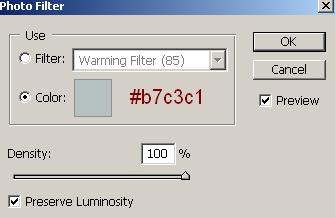
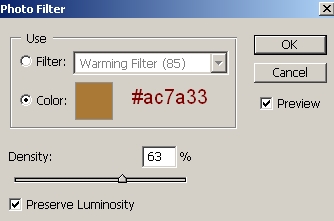
    Add a Photo Filter with Clipping Mask for model 1 layer:


    You can use black brush to erase any unwanted parts:


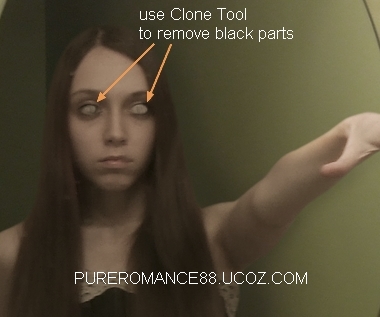
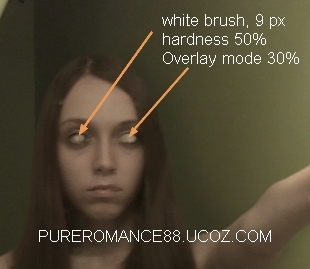
    6. In next steps we will turn model 2 into a zoombie look. Make a new layer on the top. Use Clone tool to remove black part in the pupils. 


    With a new layer, use white brush, 9 px ( depends on the size of your picture), hardness 50% painting in the eye center. Set this layer to Overlay 30%:


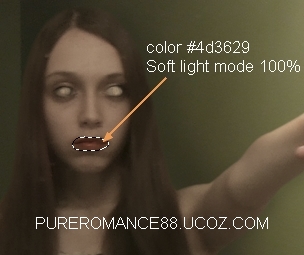
    7. Make a new layer, use soft brush with color #4d3629 to paint on the lips. Set it to Soft light 100%:


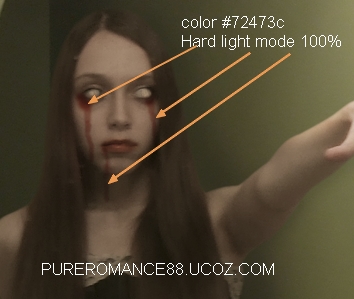
    New layer again, i use brush with hardness 10%, color #72473c painting from the eyes and lips to make dry blood stains. Set this layer to Hard light 100%:


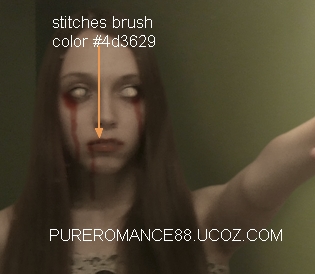
    8. Create a new layer, use stitches brush, color #4d3629 painting on lips ( you can choose the one you like). 


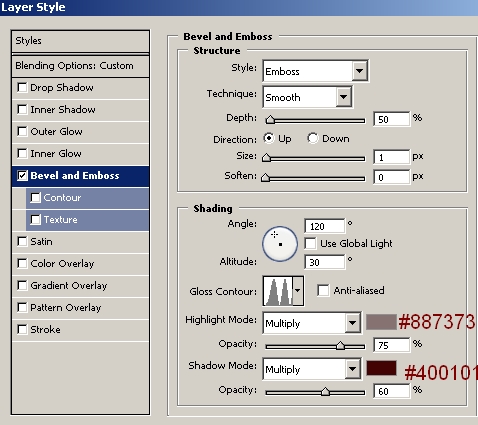
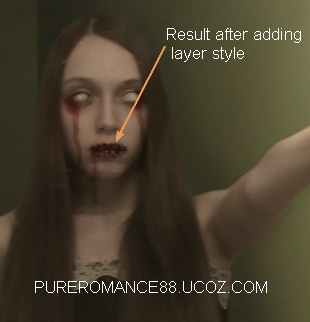
    We will add layer style to make this stitch look more realistic. Right click this layer, choose Blending options:


    We have:


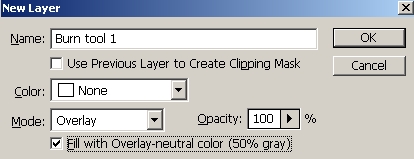
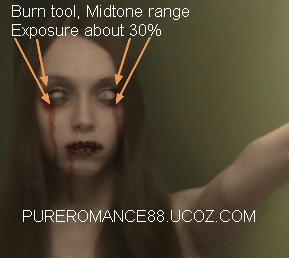
    9. To make the eyes look more terrible, i add a new layer on the top, set to Overlay and fill with 50% gray:


    Take Burn Tool with Midtones range, Exposure about 30% to paint on eyes and around the eyes to darken these parts:


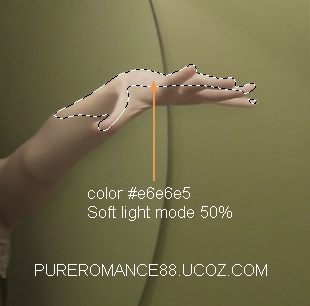
    10. To brighten more the hand part i use a new layer, brush with color #e6e6e5 to paint on it and put the mode as Soft light 50%:


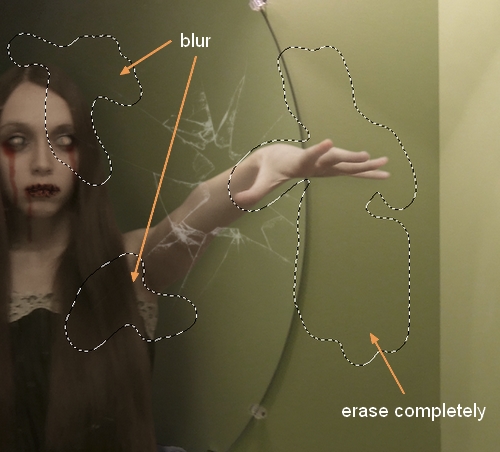
    11. To make broken effect for mirror, i use broken glass brushes, number 984 ( on a new layer of course) and set foreground color to white. Lower opacity of this layer to 40% then add layer mask, use black brushes to erase or hide the edges of it:


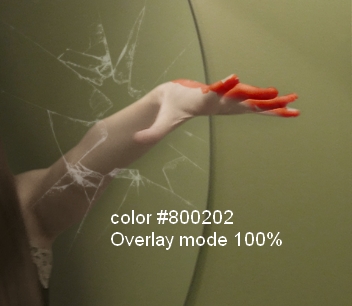
    12. Make a new layer with Overlay mode 100%, i use brush with color #800202 painting on the fingers. Then you can use erase ( or add layer mask) with brush and hardness about 40-50%, small size to trim the edges to get similar look like mine: 


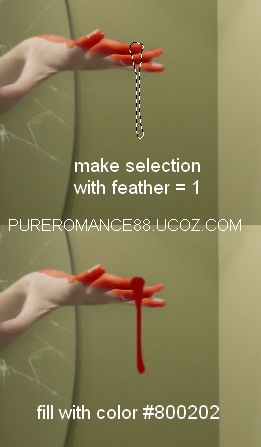
    To make a blood falling down from fingers, i create a new layer on the top. Use any tool you are familiar with to make selection like this ( i use Pen Tool to make a path then press Cmd/Ctrl+Enter to get selection), set feather =1 then fill it with color  #800202: :


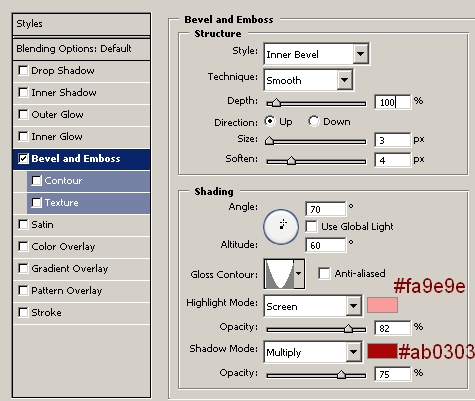
    Apply Bevel and Emboss effect for this blood:
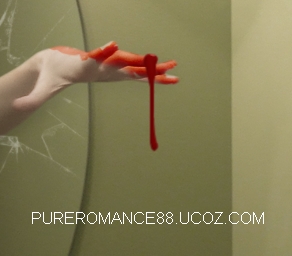

    We have :


    To make shadow and highlight for this blood, i make a new layer with Clipping Mask and settings like in step 9, use Dodge and Burn tool with Midtones Range and medium Exposure ( 40-50%):

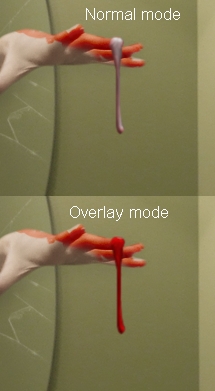
    You can see how i used these tools with Normal mode and Overlay mode ( result):


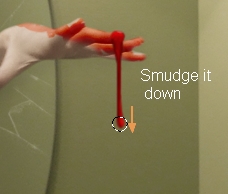
    To make the bottom of this blood look smoother, i use a new layer ( no Clipping Mask), take Smudge tool with small size and medium strength to drag down gently :


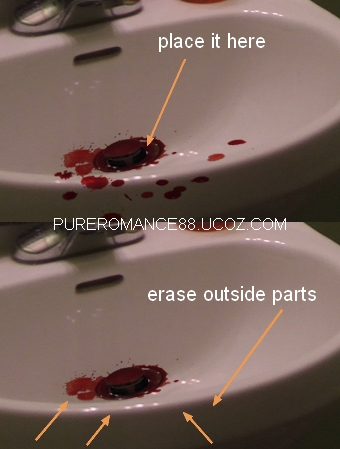
    13. We will make some blood splatter in bathroom sink. Open this stock, extract it and place in inside the sink. 

    Add layer mask to clear outside part:


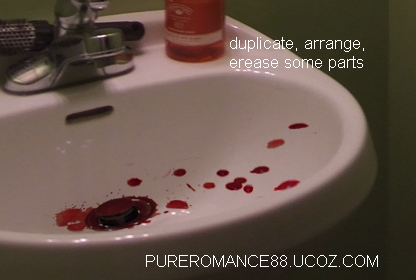
    Duplicate this layer twice, arrange and erase some parts to get similar look like this:


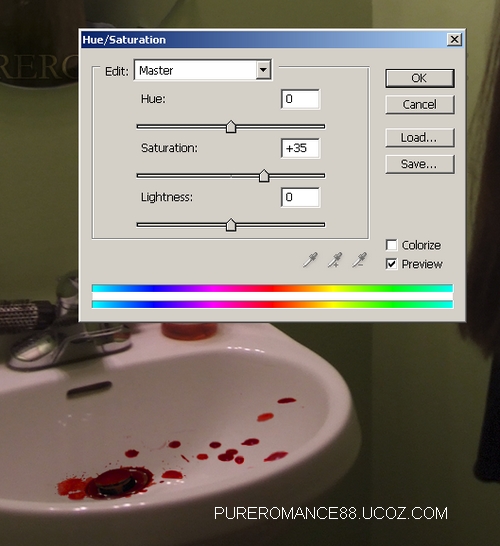
    With each blood splatter layer, make a Hue/Saturation layer ( Clipping Mask) to increase the red tone ( to fit the blood falling from above):


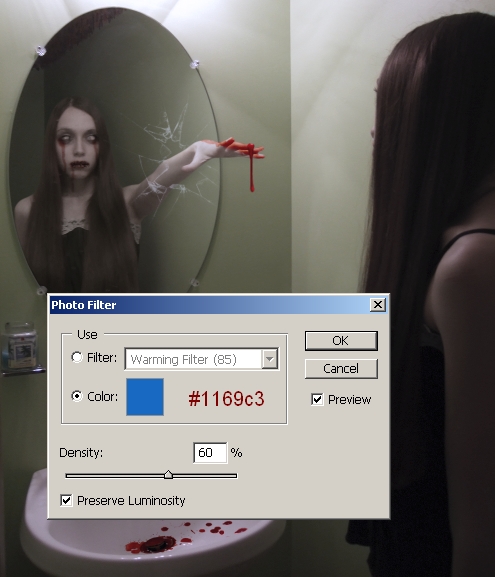
    14. Make a Photo Filter layer on the top to reduce yellow cast of picture:


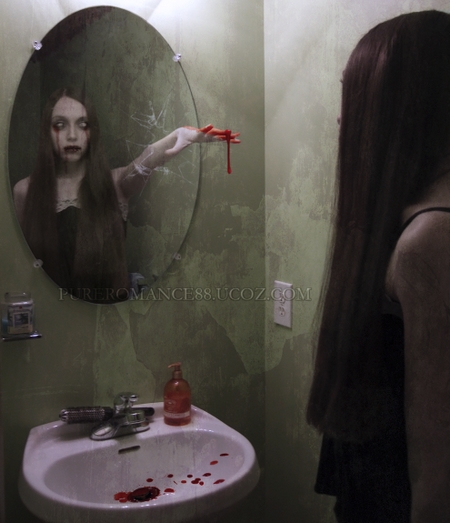
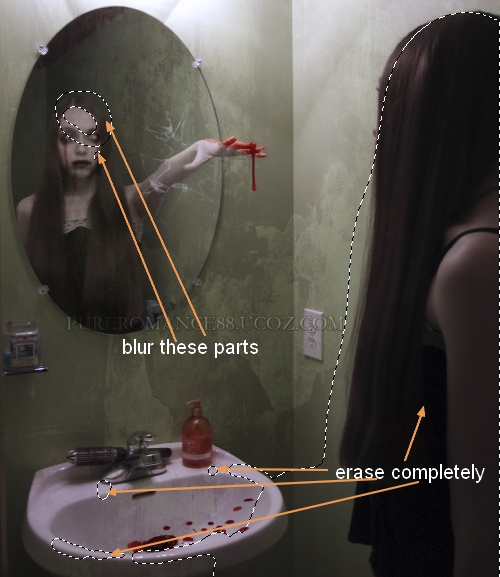
    15. Move old texture into our document, resize and change the mode to Soft light 30%. Add layer mask to erase or blur as shown below:


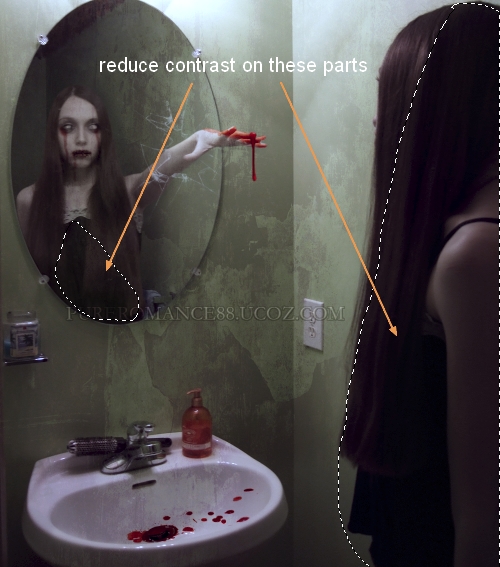
    16. Make a Color Balance layer on the top then use brush to reduce the contrast on models:
    Midtones: 11, 11, 3
    Shadows: -2, -8, 3
    Highlights: -14, 7, 13


    Selective Color:
    Reds: 42, -6, 100, 0
    Yellows: -11, -3, -39, 0
    Magentas: 38, -55, 0, 0
    Whites: -38, -41, 0, 0
    Neutrals: 8, 0, 0, 0

    Photo Filter:


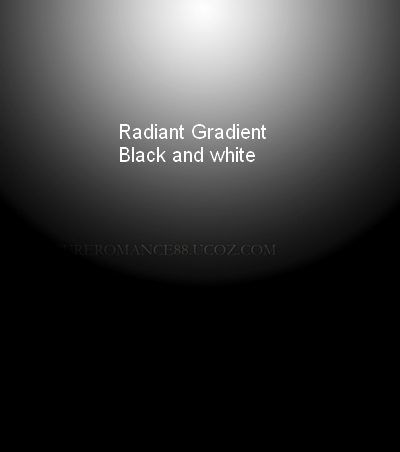
    17. Make a new layer , use Radiant Gradient with black and white:


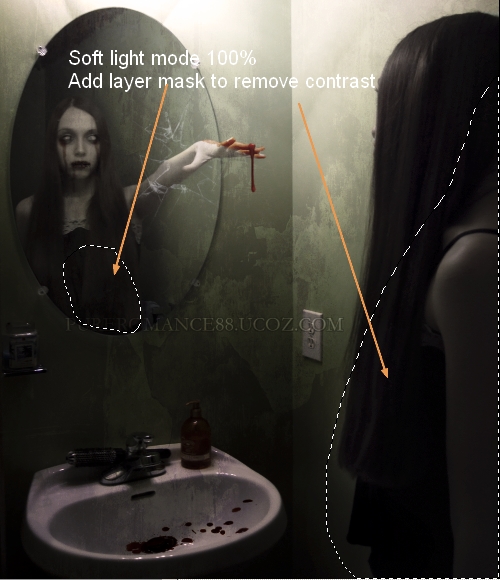
    Change the mode to Soft light 100%, add layer mask to reduce the contrast on some parts as the screenshot below shows:


    Another layer with Radiant Gradient again, Soft light mode and layer mask:


    19. Hue/Saturation layer:


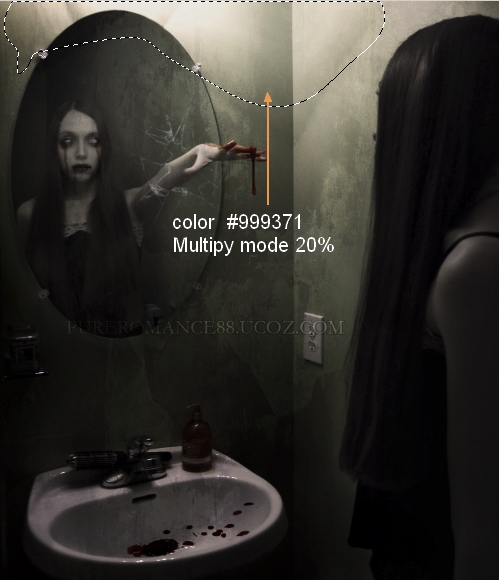
    20. Final step: After changing light and shadow of picture, the light of lamp must be darker a bit . To do it, i use a layer, choose brush with color  #999371 painting on this part , then change the mode to Multipy 20%:


    Final Result ( Full view):
    Views: 57888 | Added by: Admin | Tags: zoombie, photoshop, Mirror, Creepy, Photoshop tutorial, girl, room, Blood, Evil, dark

    ABOUT ME: I'm Jenny and i live in Hanoi, Vietnam. If you like what i write or want to keep in touch with me, you can subscribe to My blog, email me or like My Facebook page to keep updates of my latest works.

    Please ask before you want to post or translate my tutorials on other sites. I hardly decline if you ask nicely. Thank you :).

    Share
    Share |
    Total opinions: 24
    0   Spam
    1 Tiffany   (2011-10-29 10:58 PM) [Entry]
    Wonderful job! You break down the steps so it is easy to follow. Im going to try this as soon as I get some time too. Thanks for sharing these tutorials with us. Your work is great. Everyone one of us do appreciate the time you put into this and sharing with us. Thank you!

    Link with http is no
    0   Spam
    2 Admin   (2011-10-30 4:25 PM) [Entry]
    You're welcome Tiffany. If you and people found what i write useful, i feel the time for making it worthy. Thank you wink

    Link with http is no
    0   Spam
    3 Nicholas   (2011-11-01 2:51 PM) [Entry]
    Hey, love the result. Very simple yet so cool! I put a link to this tutorial on my site if you don't mind smile Keep up the good work!

    http://psd.tutsdir.com/

    Link with http is no
    0   Spam
    4 Admin   (2011-11-01 4:05 PM) [Entry]
    you're welcome. Thank you so much wink

    Link with http is no
    0   Spam
    5 anton   (2011-11-04 0:26 AM) [Entry]
    i'm very like this tutorial.
    thanks.
    happy

    Link with http is no
    0   Spam
    8 Admin   (2011-11-11 9:16 PM) [Entry]
    my pleasure biggrin

    Link with http is no
    0   Spam
    6 parveen sharma   (2011-11-05 6:56 PM) [Entry]
    i want to learn more

    Link with http is no
    0   Spam
    9 Admin   (2011-11-11 9:17 PM) [Entry]
    learn more about what?

    Link with http is no
    0   Spam
    7 Tonsy86   (2011-11-10 5:08 PM) [Entry]
    one of the best tutorials ever.. i really enjoyed it.. you're talented smile

    Link with http is no
    0   Spam
    10 Admin   (2011-11-11 9:18 PM) [Entry]
    thanks Tonsy for your compliment...it keeps me inspired biggrin wink

    Link with http is no
    0   Spam
    11 Wizzard   (2011-11-14 3:52 AM) [Entry]
    Hi!

    I did enjoy this tutorial. But as usual many tutorials like this lacks of proper explanations in some steps. This may be easy for professionals to understand anyhow, but for beginners this can be a little bit frustrating.. smile Maybe this wasn't a tutorial for beginners? smile

    When you for example say: Use Soft Light 100%. Do you mean Soft Light with Opacity 100%?

    In the endings of many tutorials I have tested they often starts to lack of good explanations. From part 12 (when it's time to make the blood on the bathroom sink) to last part I really didn't understand at all smile I think some more explanations would be great here for beginners. So I just skipped these steps completely.

    But in the end the most important thing is that I learned something! smile

    Thanks anyway and have a great life happy

    Link with http is no
    0   Spam
    13 Admin   (2011-12-30 9:07 PM) [Entry]
    Hi,
    It's a photo manipulation tutorial, not a tutorial which teaches basic tools! I cant explain in details how to use brush, how to add layer mask or change opacity of layers! You should learn and pratice basic tools before doing more advanced designs. It's the reason why there are basic tutorials and there are advanced ones. Do you know how much effort that goes into a good tutorial? So pls be understanding to us writers. Try to write some tutorials then better ones. Hower im glad you learned something from here and thanks for your comment as well.

    Link with http is no
    0   Spam
    12 David Dimbu   (2011-12-17 10:35 PM) [Entry]
    CONGRETULATION MIGHTY TUTORIEL^_^

    Link with http is no
    0   Spam
    15 Admin   (2011-12-30 9:09 PM) [Entry]
    thank you wink

    Link with http is no
    0   Spam
    14 Admin   (2011-12-30 9:08 PM) [Entry]
    because i think it's pretty far from bathroom sink so the shadow might be hard to be seen biggrin

    Link with http is no
    0   Spam
    16 ecclubkr   (2012-01-17 3:41 PM) [Entry]
    i love jenny! Hacking refused! happy ;;

    Link with http is no
    0   Spam
    17 Admin   (2012-02-13 3:43 PM) [Entry]
    hehe thank u biggrin tongue wink

    Link with http is no
    0   Spam
    18 yayuzaidi7199   (2012-02-15 7:43 AM) [Entry]
    nice tuts dear.. i will try it soon.. love ur website so much.. giving me a lots of inspired.. falling in love with PS now... biggrin

    Link with http is no
    0   Spam
    19 Admin   (2012-03-12 1:56 PM) [Entry]
    you're welcome dear...im happy to know it...will try to update it oftener biggrin ...thanks very much for your support wink

    Link with http is no
    0   Spam
    20 ataul haque kanchan   (2012-05-20 2:32 PM) [Entry]
    Awe-inspiring,indeed.

    Link with http is no
    0   Spam
    21 Admin   (2012-05-20 11:51 PM) [Entry]
    thank you tongue , it's my pleasure to know! biggrin

    Link with http is no
    0   Spam
    22 eastar autocuiseur   (2012-06-11 5:22 AM) [Entry]
    Hey, affecting represent !

    Link with http is no
    0   Spam
    23 Admin   (2012-07-05 10:12 PM) [Entry]
    wink

    Link with http is no
    0   Spam
    24 mehak   (2013-11-08 9:31 PM) [Entry]
    tongue tongue

    Link with http is no
    t allowed due to spams. Thanks for your understanding.

    Name *:
    Email:
    Subscription:
    Code *:

    Copyright MyCorp © 2024
    Free web hostinguCoz
    ?if()?>?endif?>2s5164>-->Log out