Create a Nature themed, Astract photo manipulation - 7 March 2012 - Poetry, Writings, Art, Design
Saturday, 2013-05-25, 9:23 PM

Creativity comes from simplifying

Main | Registration | Login
Welcome Guest
RSS
MY TUTORIALS ON OTHER SITES
  • Create a dark photo manipulation of a devil woman

  • Design a summer time vacation poster

  • Create a space battle scene in Photoshop

  • Create a garden scene with a cat gazing at a fish cloud

  • Create a beautiful mixed media portrait in photoshop

  • Create a bunny house in photoshop

  • Create a Surreal Head Of Tree Photo Manipulation

  • Create a Dark and Surreal Photo Manipulation "Volcano Spirit"

  • Create a Mysterious and Fantasy Woman Portrait in Photoshop

  • Create a Snowy Night Landscape Matte Painting

  • Create a Christmas night landscape photo manipulation

  • Create a colorful photo manipulation "Simple Life"

  • Create a fantasy forest fire scene photo manipulation

  • Create a floating superhero scene with sci-fi lighting effect

  • Create a Beautiful Abstract Cosmic Photo Manipulation

  • Create a Nature Inspired Advertisement Design

  • Create a Dark Ghostly Scene Photo Manipulation

  • Create a Fantasy Witch Scene Photo Manipulation

  • Create a fantasy halloween witch cat photo manipulation

  • Create a beautiful sunrise landscape matte painting in photoshop

  • Create a Surreal Photo Manipulation "Flooded"

  • Create a Surreal Portal Scene with Powerful Lighting effect

  • Create a Sci-fi photo manipulation "Space Station"

  • Create emotional photo manipulation "Magical Rose"

  • Create An Eerie Abstract Photo Manipulation

  • Create a Surreal Photo Manipulation Sky Gate

  • Create a Fantasy Mushroom House Photo Manipulation

  • Create a Surreal Photo Manipulation "Daydream"

  • Create a Dark Photo Manipulation "Nocturna"

  • Create an emotional sunset photo manipulation

  • Create a cat in a magical pond scene photo manipulation

  • Create a surreal photo manipulation Coffee Mind

  • Create a Fantasy floating park photo manipulation

  • Twisting Water-Surreal photo manipulation

  • Firing Heart-Emotional photo manipulation

  • Create a dramatic building explosion scene

  • Let me sink-Emotional rainy scene photo manipulation

  • Create a colorful and futuristic photo manipulation

  • The Sky Station - Surreal photo manipulation

  • The Vampire Hunter - Dark photo manipulation

  • Dark storm scene photo manipulation

  • The Released - Dark and surreal photo manipulation

  • Wounded rose - Create an abstract photo manipulation

  • Create a dark and emotional photo manipulation

  • Create a dramatic battle scene in photoshop

  • The Forgotten - Dark an conceptual photo manipulation

  • Night's butterfly-Create a dark and mysterious fantasy portrait

  • Create an anti-smoking concept design in photoshop

  • A dreamy world-Create a fantasy landscape

  • Create a dramatic action scene poster

  • Create a nature inspired, out of bound photo effect in photoshop

  • Cool metal text effect

  • Dance in blue - Fantasy photo manipulation

  • Emotional night scene - Photo manipulation

  • Create a lovely 3D like butterfly in Photoshop

  • Create a beautiful Valentine background with moon and heart

  • Create a beautiful and romantic Valentine wallpaper

  • Beautiful pink flower portrait

  • Create a beautiful spring greeting card in photoshop

  • Beautiful spring-Fantasy photo manipulation

  • Cool floral 3D text effect

  • Colorful bokeh heart effect

  • Retro artistic effects

  • Sexy ghost in the uninhabited house-Dark photo manipulation

  • Colorful and glamour composition style in photoshop

  • Glowing text in colorful fantastic space scene

  • Magical blossom dance-Fantasy photo manipulation

  • RECENT TALKS

    Rachel, when you mak...


    how do you do that? ...

    Did you change the m...

    TAGS
    rose Light red Winter Photoshop tutorial My poetry Text effect Blood romantic Rain colorful model Blend Beauty pattern Creative special effect glowing spring Heart painting Beautiful girl Pink butterfly glitter freebie Autumn Misc Photo effect Woman Stock Design Photoshop basic abstract Surreal Cosmic yellow star season twitter Forest vector dark photos Portrait Purple Sofr color light Nature NIGHT Snow wallpaper sparkling Mood Fallen love Photo manipulation Effect drawing Penelope Cruz photo Fonts Soft green Blue Life icon flower BANNER Sky music missing red Feeling GHost gif font face Calligraphy background angel Sweet Photo retouch Asadal girl Fantasy Random thoughts Dreamy frame My story Mandy Moore photoshop Beautiful graphics Art Inspiration script actress Skin Encouragement
    ARCHIEVES
    SEARCH


    RECENT POSTS
    [2013-05-21]
    Free star backgrounds
    [2013-03-07]
    Create a colorful abstract cosmic photo manipulation
    [2013-03-05]
    Free abstract shapes and light streaks
    [2012-05-20]
    On My Road - Surreal Photo Manipulation
    [2012-03-07]
    Create a Nature themed, Astract photo manipulation
    MOST POPULAR
    [2010-07-26]
    Complete portrait retouching
    Views: 62720
    [2011-01-31]
    Create beautiful glowing flowers
    Views: 55079
    [2010-11-15]
    25 beautiful dreamy effect photoshop tutorials
    Views: 54442
    [2010-11-26]
    The enchanted forest- Fantasy photo manipulation
    Views: 53024
    [2011-01-15]
    Color blending collection 3
    Views: 42552
    [2010-08-22]
    Color blending collection I
    Views: 39621
    [2012-05-20]
    On My Road - Surreal Photo Manipulation
    Views: 39482
    [2011-06-14]
    Create a burning girl with fire effect
    Views: 39229
    [2010-03-15]
    Beautify a portrait
    Views: 38001
    [2010-05-29]
    Enhance portrait photo with natural look
    Views: 36424
    MOST TALKED
    [2010-11-26]
    The enchanted forest- Fantasy photo manipulation
    Opinions : 81
    [2011-01-31]
    Create beautiful glowing flowers
    Opinions : 80
    [2010-03-15]
    Beautify a portrait
    Opinions : 43
    [2010-12-06]
    The Winter Queen - Fantasy photo manipulation
    Opinions : 43
    [2010-10-10]
    Create a beautiful emotional black and white love scene
    Opinions : 41
    [2010-07-06]
    Create beautiful golden skin effect using three different ways
    Opinions : 39
    [2010-07-26]
    Complete portrait retouching
    Opinions : 36
    [2010-12-15]
    Sweet red 3D love text effect
    Opinions : 36
    [2011-01-15]
    Color blending collection 3
    Opinions : 36
    [2010-08-22]
    Color blending collection I
    Opinions : 36
    RANDOM POSTS
    [2010-01-08]
    In twilight
    [2010-12-15]
    Sweet red 3D love text effect
    [2010-05-03]
    Create a painting effect in photoshop
    [2010-02-22]
    Blend - Nice and fresh green
    [2011-01-15]
    Color blending collection 3
    MY FAVORITE SITES
  • PSD Tutsplus
  • FanExtra network
  • Webmaster tutorials
  • Typography resources
  • STATISTICS

    Total online: 3
    Guests: 3
    Users: 0
    Main » 2012 » March » 7 » Create a Nature themed, Astract photo manipulation


    12:11 PM
    Create a Nature themed, Astract photo manipulation

    Time to update my blog  .

    In this tutorial i will show you how to create a nature themed, abstract photo manipulation. You'll learn how to use different textures, brushes as well as adjust colors to make an interesting abstract piece .

    Resources:
    Butterfly: my own  

    1. Create a new document and fill it with white. You can choose the size you like but i use 1000x1000 px.
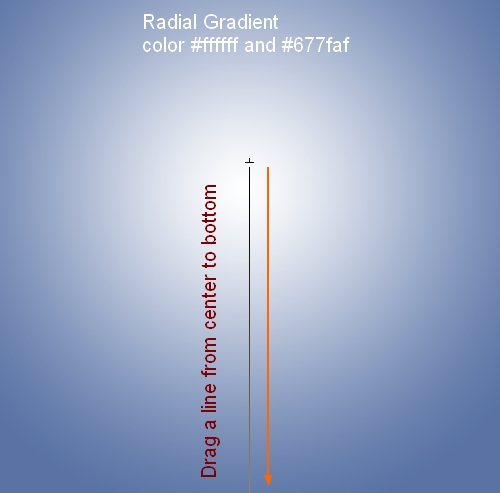
    Create a new layer and click G to active Gradient Tool. and choose Radial Gradient with white and #677faf.
    Drag a line from center to bottom:


    Lower opacity of this layer to 50%:


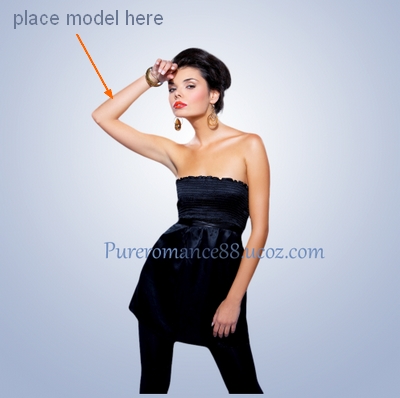
    2. Extract model from background and place her into our document. 


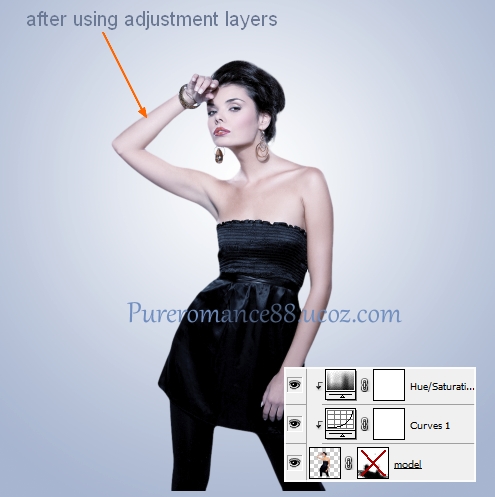
    To change color of model to be fit background, i use some adjustment layers with Clipping Mask for her.
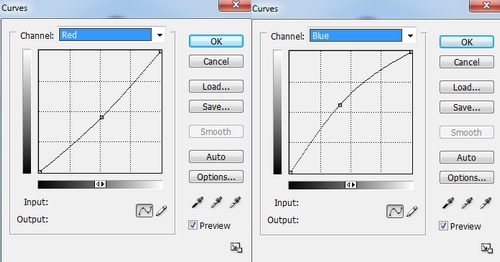
    First, go to Layer-New adjustment layer-Curves:


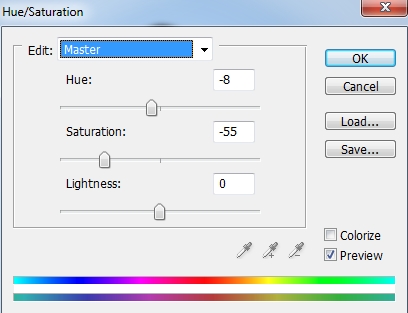
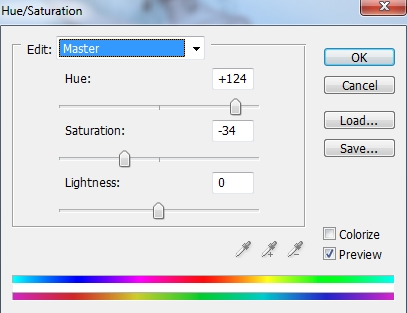
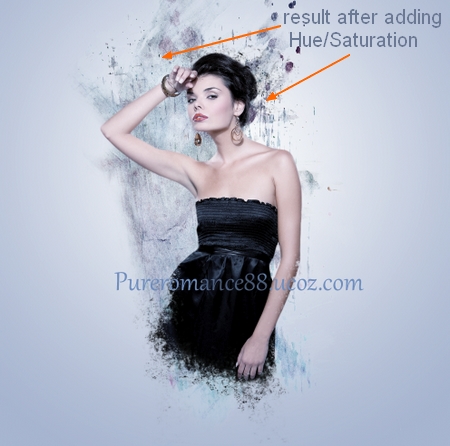
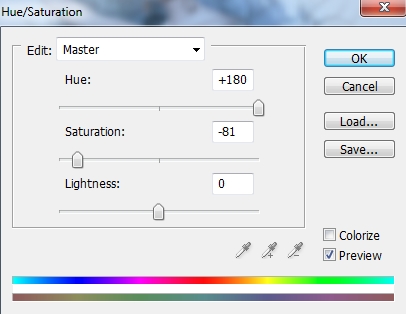
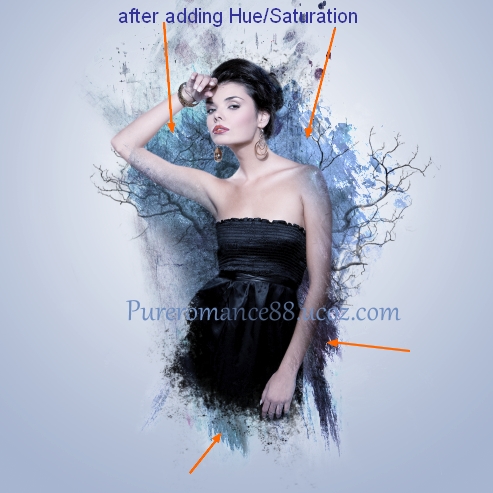
    Then Layer-New adjustment layer-Hue/Saturation:


    3. Add layer mask for model layer. Take random grunge brushes and paint on model head, model legs and the right arm to make shattered effect. Try different brushes to get rid of fake look:


    To add more particle effect , make a new layer on the top. Set foreground color to black and use grunge brushes to paint around model head and under model dress. You can use Eraser Tool or add layer mask to remove any unwanted parts:


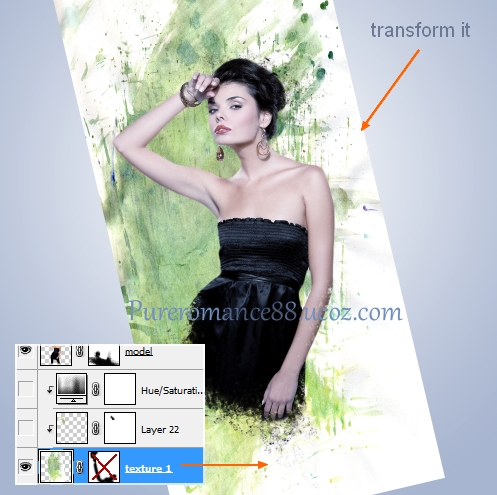
    4. Open watercolor texture 1. Drag it into our ducument, resize, transform  ( Cmd/Ctrl+T) and place it under model layer. 


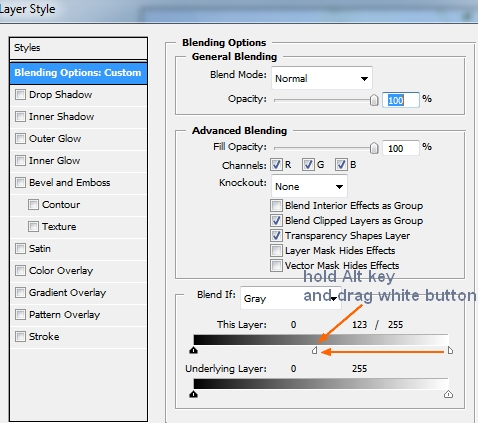
    To remove most of white parts of background, i use Blend If tool. Right click this layer, choose Blending options. Hold the Alt/Option key and drag white button of This Layer:


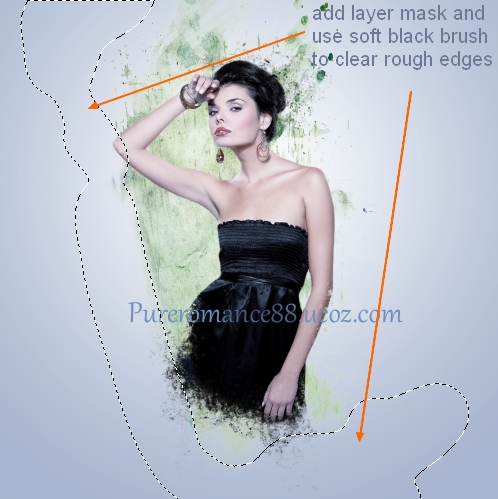
    Add layer mask and use soft black brush to clear remained white part:


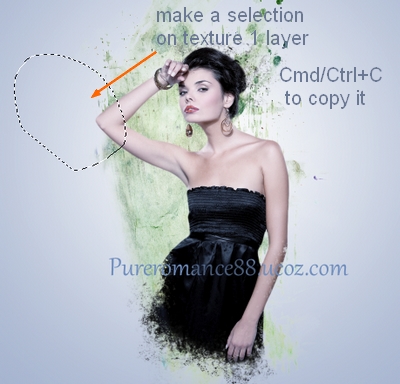
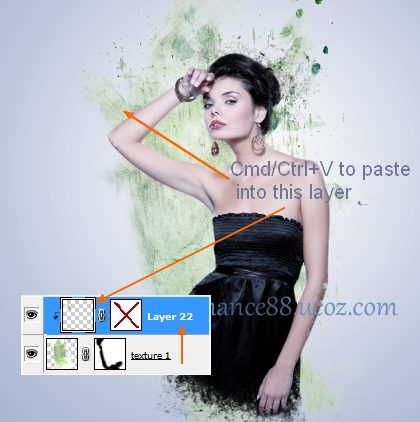
    Create a new layer above texture 1 with Clipping Mask. Come back to texture 1 layer, use Lasso Tool ( L) to make a selection for a part as shown below. Press Cmd/Ctrl+C to copy it. On new layer above, hit Cmd/Ctrl+V to paste copied part into it:


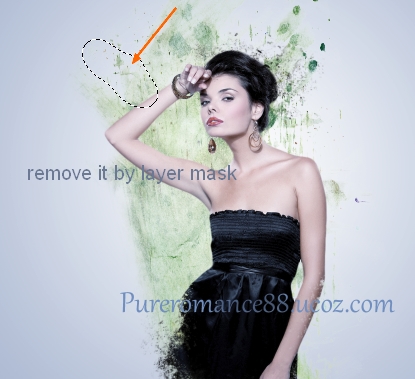
    Add layer mask to remove unwanted part:


    5. To change color of this texture, i use a Hue/Saturation layer with Clipping Mask:


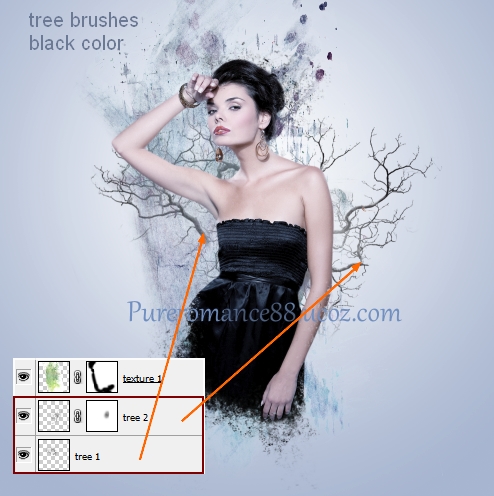
    6. Create two new layers under texture 1 layer. Set foreground color to black. Use two random tree brushes and paint behind model back. You can use transform tool and add layer mask to remove unecessary parts:


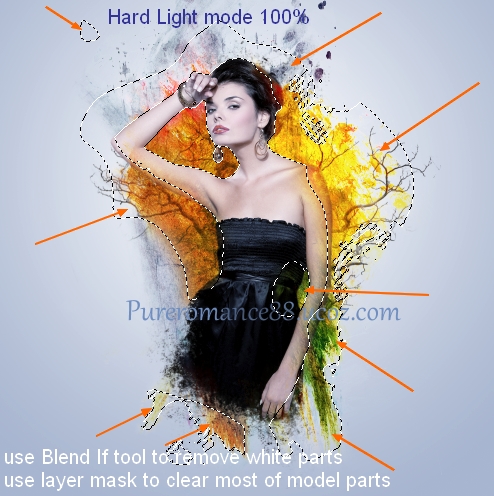
    7. Open watercolor texture 2. Drag it into our canvas and place it on the top. Use Blend If tool  to remove white parts as we did in step 4. Change the mode of this texture to Hard Light 100%. Then add layer mask and use brush to make most of model part visible again. 


    Add a Hue/Saturation layer with Clipping Mask for this texture:


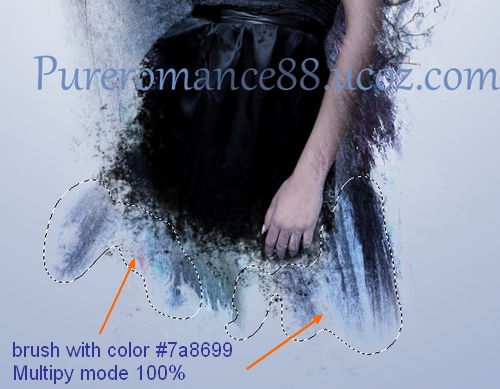
    Create a new layer ( Clipping Mask), take soft brush with color #7a8699. Paint on any white parts you've noticed . Change the mode to Multipy 100%:


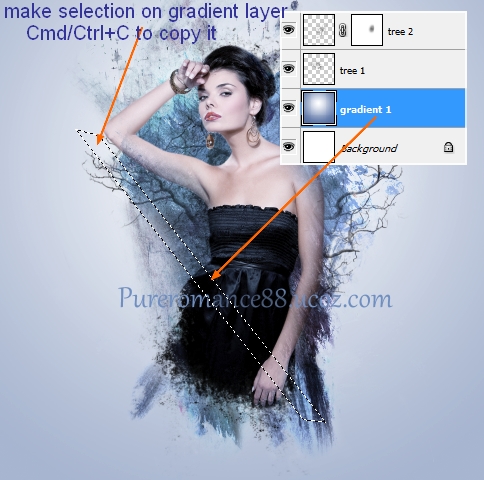
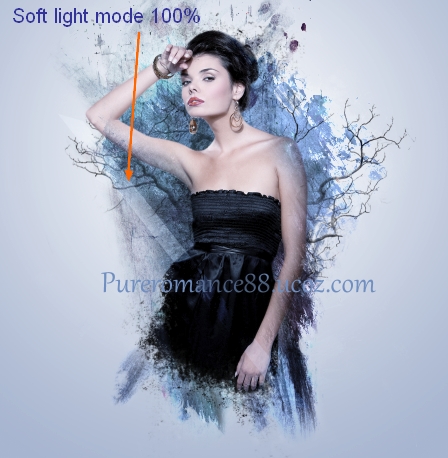
    8. Create a new layer on the top. On gradient layer ( which is created in step 1), use Polygonal Lasso Tool to make a selection and hit Cmd/Ctrl+C to copy this part:


    On new layer which is just created, hit Cmd/Ctrl+V to paste into it:


    Change the mode to Soft light 100%.


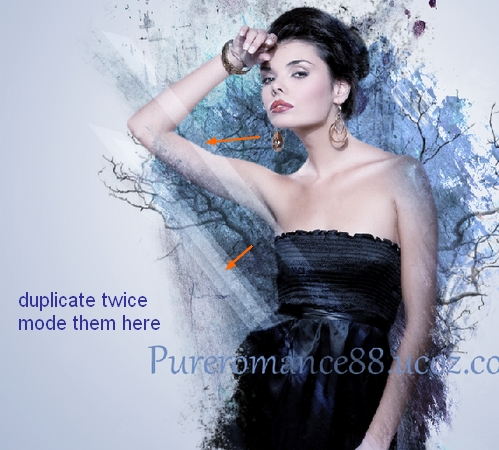
    Duplicate this layer twice and move them into different position. Resize one of them to be smaller:

    Add layer mask to clear or blur the top and some parts of these lines:


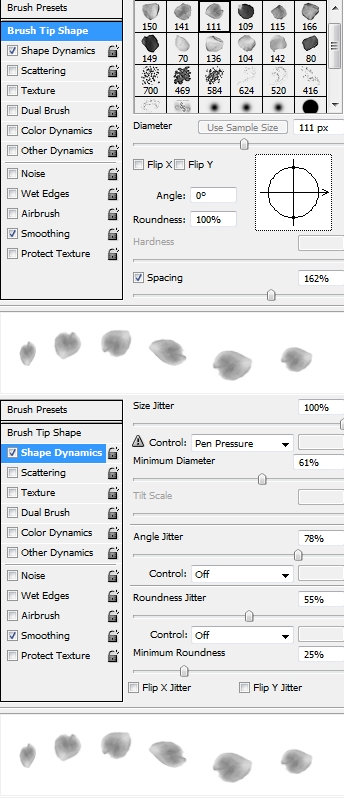
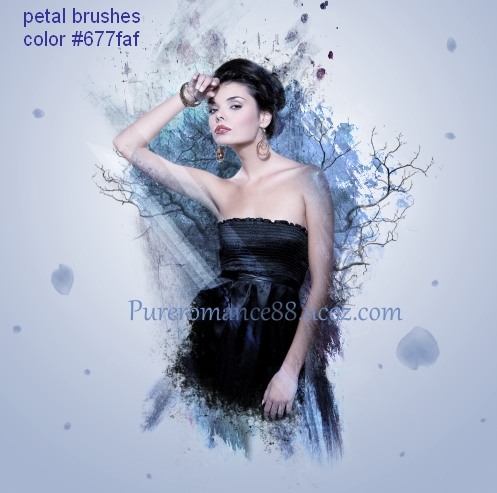
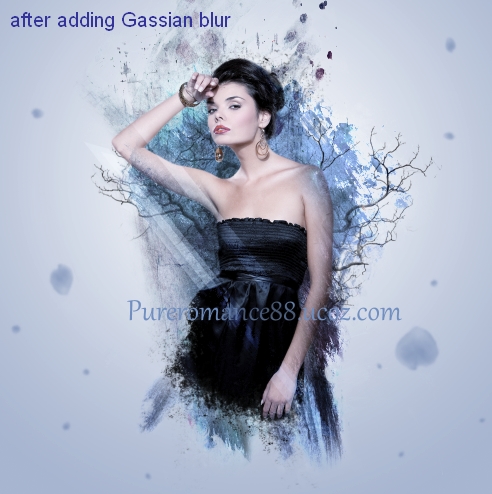
    9. Make a new layer on the top. Use rose petal brushes , number 111 ( or any you like) with color #677faf . Press F5 to make settings for these brushes:


    Paint on background then lower brush size to 30-40 px to continue painting:


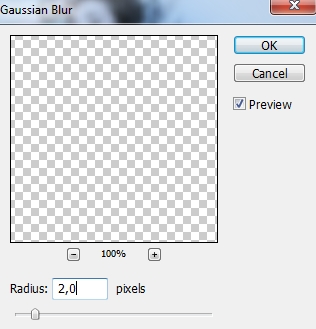
    To add some depth for picture i want to blur these petals. Go to Filter-Blur-Gassian Blur:


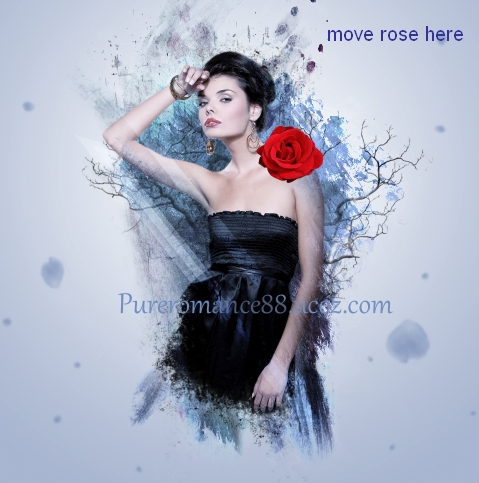
    10. Open rose stock pack. Choose the one you like and use Lasso Tool to make selection around it, resize and move into our document:


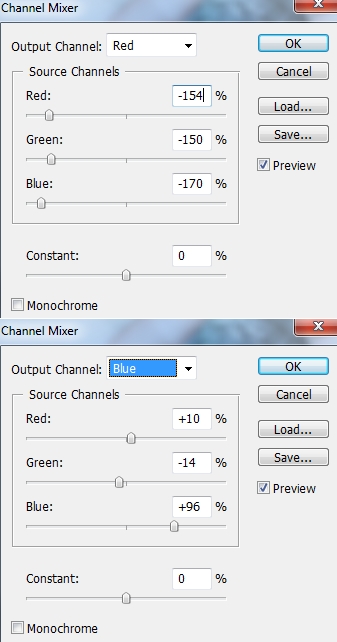
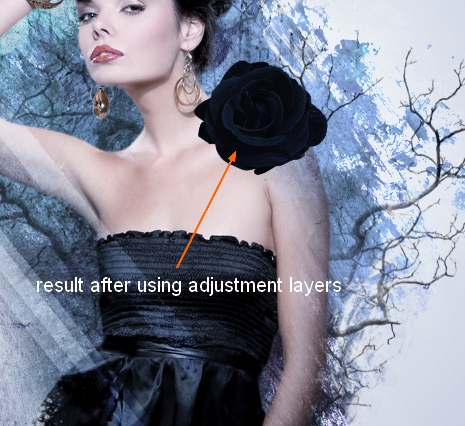
    Add two adjustment layers ( Clipping Mask) to change color of the rose:
    Channel Mixer:


    Hue/Saturation:


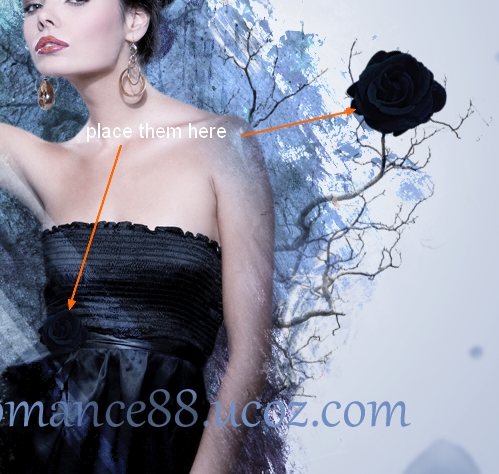
    Choose 3 these layers ( rose, two adjustment layers), hit Cmd/Ctrl+G to make group for them. Right click this group, choose Duplicate Group. Then on duplicated group, choose Merge Group. Now we can use this merged group as a normal layer. Duplicate this layer and scale it down. Position them as the image below shows:


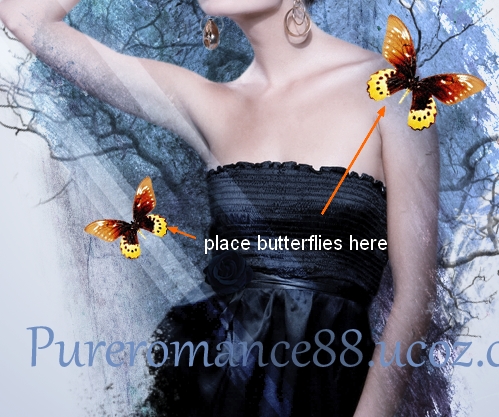
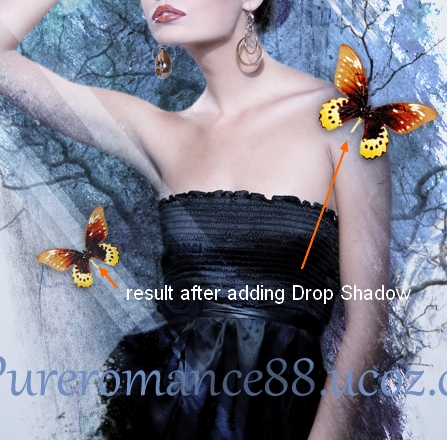
    11. Open butterfly stock. You can easily find a free stock butterfly on the web. Extract it and move into our canvas, duplicate and resize them. Transform them into different movement:


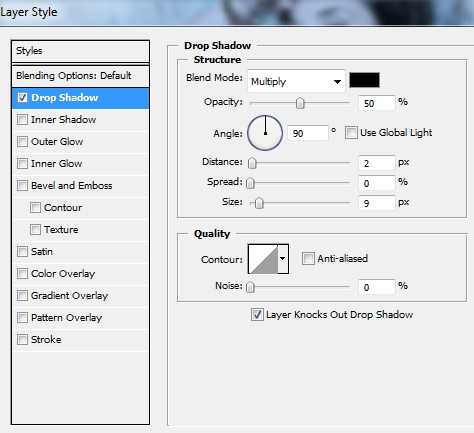
    Right click each butterfly layer, choose Blending options:


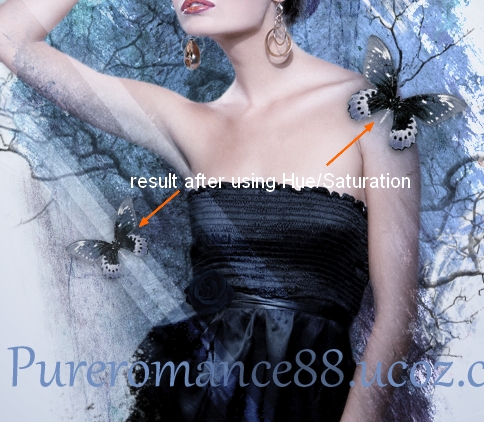
    With each butterfly layer, add a Hue/Saturation layer with Clipping Mask:


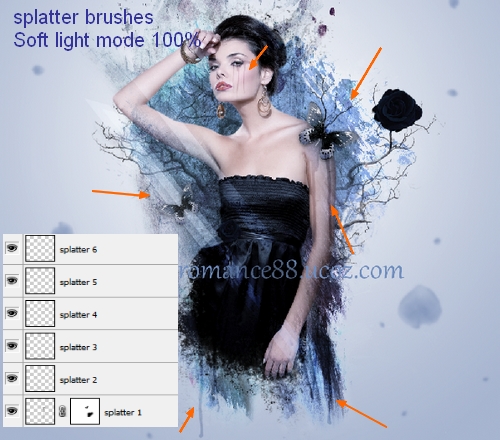
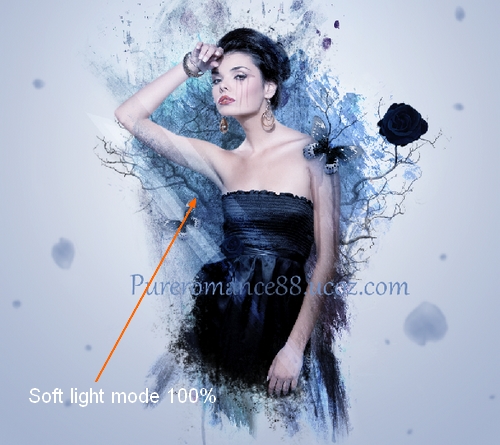
    12. Create 6 new layers on the top and set foreground color to black. On each layer, use splatter brushes to paint on different parts of model and change the mode to Soft light 100%. You can use Eraser Tool or add layer mask to remove any unwanted parts. 


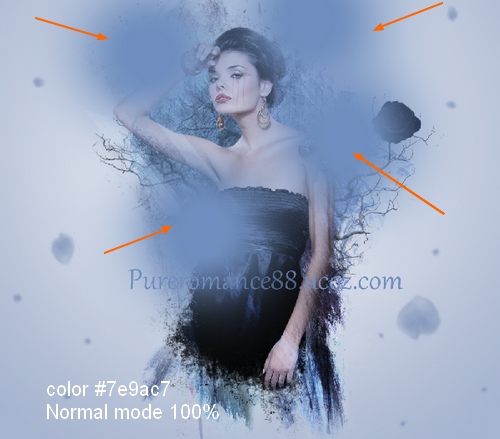
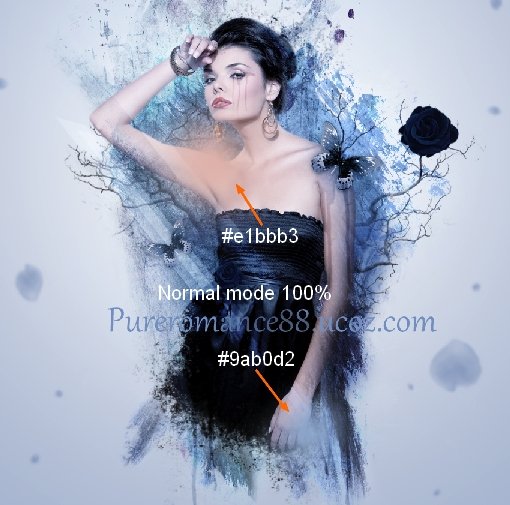
    13. Make a new layer and use soft brush with color #7e9ac7. Paint on some parts of picture and change mode to Soft light 100%:


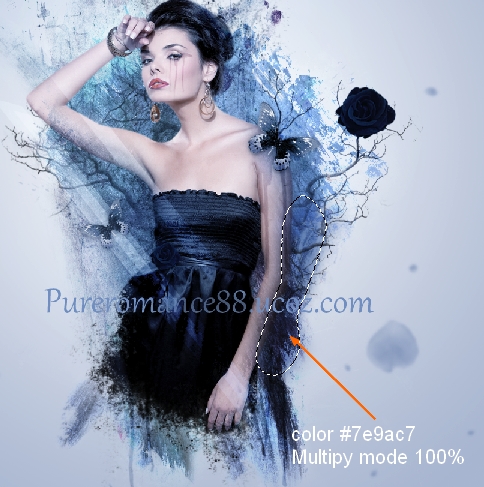
    Make a new layer, use brush with same color. Paint on the right arm and change mode to Multipy 100%:


    New layer and use brush with color #9ab0d2 and #e1bbb3. Paint on the left shoulder and the right hand. Change the mode to Hard Light 100%:


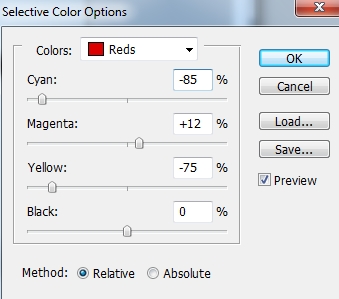
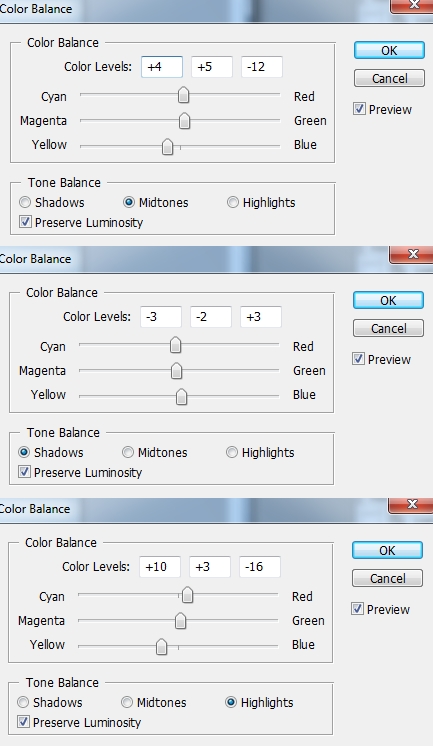
    14. Create two new adjustment layers on the top :
    Selective Color:


    Color Balance:


    You can merge all layer and sharpen it with Unsharp Mask if you want.
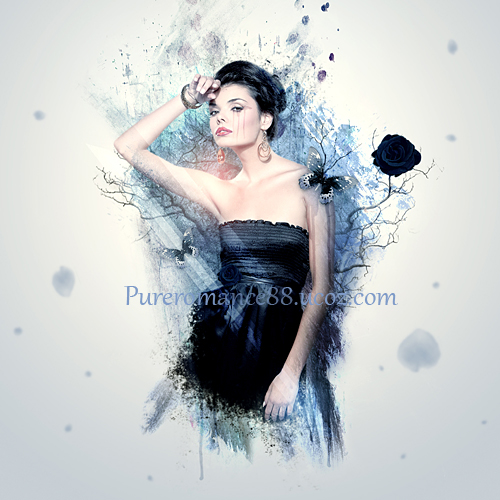
    Final Result:

    Views: 33902 | Added by: Admin | Tags: Photo effect, photoshop, model, Photoshop tutorial, Grunge, Splatter, rose, Photo manipulation, Beauty, abstract

    ABOUT ME: I'm Jenny and i live in Hanoi, Vietnam. If you like what i write or want to keep in touch with me, you can subscribe to My blog, email me or like My Facebook page to keep updates of my latest works.

    Please ask before you want to post or translate my tutorials on other sites. I hardly decline if you ask nicely. Thank you :).

    Share
    Share |
    Total opinions: 21
    0  
    1 Porscha Simone   (2012-03-08 9:55 AM)
    Beautiful work!! This is a very inspirational piece. I'm going to try something similar! Thanks a lot! biggrin

    0  
    3 Admin   (2012-03-12 3:05 PM)
    im glad to know biggrin ! thank you wink

    0  
    2 senja   (2012-03-12 2:06 PM)
    nice

    0  
    4 Admin   (2012-03-12 3:06 PM)
    thanks tongue

    0  
    5 Manisha   (2012-03-13 11:31 AM)
    fantastic work, will definitely try to do something similar....keep it up! Adding this page in my Favorite list. smile

    0  
    9 Admin   (2012-03-25 3:45 PM)
    thank you so much, appreciate it wink

    0  
    6 Nagender   (2012-03-15 12:23 PM)
    hi sir

    0  
    12 Admin   (2012-03-25 3:46 PM)
    im not sir biggrin

    0  
    7 Chioma   (2012-03-15 6:05 PM)
    Great work. Thanks

    0  
    10 Admin   (2012-03-25 3:46 PM)
    you're welcome wink

    0  
    8 Logoswish   (2012-03-18 11:02 PM)
    Interesting tutorial. Nice work.

    0  
    11 Admin   (2012-03-25 3:46 PM)
    thank you biggrin

    0  
    13 lovely_me   (2012-03-28 11:33 PM)
    creative+smart+ talent = pureromance88

    0  
    14 Admin   (2012-04-18 3:42 PM)
    hehe thanks...but i'm just trying to be like that biggrin tongue

    0  
    15 Brandon Bates   (2012-08-07 9:06 AM)
    I found this tutorial to be very helpful and provide a lot of insights to how to create dynamic photoshop images. I really appreciate you sharing your wisdom, insight and knowledge and pray that blessings be multiplied and returned to you for your selfless act of sharing beauty and knowledge.

    0  
    16 Admin   (2012-09-27 11:46 PM)
    aww thank you so much for great warm words for me and my tutorial! i really appreciate it. I'll try to keep my site more updated. Best to you wink

    0  
    17 Saikul Islam   (2012-10-02 12:28 PM)
    Fabulous photo manipulation really......I lover it......

    0  
    18 Admin   (2012-10-04 0:41 AM)
    thank you wink

    0  
    19 Tamara   (2013-03-24 11:38 AM)
    an absolute wonderful tutorial, was very helpful in helping me create a picture with a few of your pointers.. thank you again. hope to see more of your tutorials wave

    0  
    20 Admin   (2013-03-28 10:30 AM)
    you're very welcome and thanks for letting me know it! i'll kt to keep my site more updated  wink

    0  
    21 ilyasarena   (2013-05-05 8:21 PM)
    Nice.................
    very very nice

    Something you should read before leaving your words:

    1. Pls use English or Vietnamese only which i can understand. Comments with another languages will be deleted.

    2. Pls be kind. You can say your own thinkings, opinions, ideas even negative ones, but i don't accept the rudeness or if you lack the respect to me and my readers.
    3. Pls don't use only emoticons or one word "hi" to represent your voice. All of such comments will be deleted. If you really want to say something, why don't leave more impressions?
    4. No spam, advertisement ( cheap host, back link...) or stuffs that are not relevant to me or my blog content. Comments are always pre-moderated so the spams will not get any chances to be published.
    5. Pls don't ask if they are not relevant to my blog content ( for example: ask me to help to do an effect on another site). I've been so busy so hard to follow such requests.
    6. Html code for comment board is disabled. So pls don't use it here. But if you want to leave the link of your site here, just do it with prefix http://. For example http://www.google.com. Is it simple, isn't it ?
    And now, have fun!


    Name *:
    Email:
    Code *:

    Copyright MyCorp © 2013
    Free web hosting - uCoz
    ?if()?>?endif?>2s5164>-->Log out