Color blending collection IV - 30 July 2011 - Poetry, Writings, Art, Design
Monday, 2012-05-28, 12:27 PM

Creativity comes from simplifying

Main | Registration | Login
Welcome Guest
RSS
MY TUTORIALS ON OTHER SITES
  • Create an emotional sunset photo manipulation

  • Create a cat in a magical pond scene photo manipulation

  • Create a surreal photo manipulation Coffee Mind

  • Create a Fantasy floating park photo manipulation

  • Twisting Water-Surreal photo manipulation

  • Firing Heart-Emotional photo manipulation

  • Create a dramatic building explosion scene

  • Let me sink-Emotional rainy scene photo manipulation

  • Create a colorful and furistic photo manipulation

  • The Sky Station - Surreal photo manipulation

  • The Vampire Hunter - Dark photo manipulation

  • Dark storm scene photo manipulation

  • The Released - Dark and surreal photo manipulation

  • Wounded rose - Create an abstract photo manipulation

  • Create a dark and emotional photo manipulation

  • Create a dramatic battle scene in photoshop

  • The Forgotten - Dark an conceptual photo manipulation

  • Night's butterfly-Create a dark and mysterious fantasy portrait

  • Create an anti-smoking concept design in photoshop

  • A dreamy world-Create a fantasy landscape

  • Create a dramatic action scene poster

  • Create a nature inspired, out of bound photo effect in photoshop

  • Cool metal text effect

  • Dance in blue - Fantasy photo manipulation

  • Emotional night scene - Photo manipulation

  • Create a lovely 3D like butterfly in Photoshop

  • Create a beautiful Valentine background with moon and heart

  • Create a beautiful and romantic Valentine wallpaper

  • Beautiful pink flower portrait

  • Create a beautiful spring greeting card in photoshop

  • Beautiful spring-Fantasy photo manipulation

  • Cool floral 3D text effect

  • Colorful bokeh heart effect

  • Retro artistic effects

  • Sexy ghost in the uninhabited house-Dark photo manipulation

  • Colorful and glamour composition style in photoshop

  • Glowing text in colorful fantastic space scene

  • Magical blossom dance-Fantasy photo manipulation

  • RECENT TALKS
    TAGS
    Winter photoshop love model GHost 3D valentine Letter sparkling Asadal My story Penelope Cruz Fantasy Effect spring Forest dark graphics font Mandy Moore Misc fruit Memory glitter Random thoughts FLY rose Skin Photo manipulation BANNER Woman Blend background Heart NIGHT Blue vector wallpaper Blood Calligraphy Dreamy yellow Fonts lake Life Soft Sweet Stock flower My poetry colorful gif red season HOUSE Beauty painting script Autumn summer girl Sky drawing Text effect Feeling green missing Inspiration Wind Design Snow light Typography butterfly Beautiful pattern Golden Mood Photoshop tutorial Pink Photo effect abstract Nature frame music Surreal romantic color Portrait photos glowing photo icon Creative Rain Beautiful girl special effect Photo retouch Burning Hurt
    ARCHIEVES
    SEARCH


    RECENT POSTS
    [2012-05-20]
    On My Road - Surreal Photo Manipulation
    [2012-03-07]
    Create a Nature themed, Astract photo manipulation
    [2011-10-29]
    The Mirror - Dark and horror photo manipulation
    [2011-07-30]
    Color blending collection IV
    [2011-06-20]
    Give your ordinary portrait photo glamorous effect with charming make-up
    MOST POPULAR
    [2010-07-26]
    Complete portrait retouching
    Views: 43361
    [2010-11-26]
    The enchanted forest- Fantasy photo manipulation
    Views: 40197
    [2011-01-31]
    Create beautiful glowing flowers
    Views: 36054
    [2011-01-15]
    Color blending collection 3
    Views: 34769
    [2010-08-22]
    Color blending collection I
    Views: 30115
    [2010-10-27]
    Create a model look with naturally perfect skin
    Views: 28012
    [2010-05-29]
    Enhance portrait photo with natural look
    Views: 27693
    [2010-11-15]
    25 beautiful dreamy effect photoshop tutorials
    Views: 27514
    [2010-09-14]
    Soft and dreamy movie effect
    Views: 26257
    [2010-03-15]
    Beautify a portrait
    Views: 25677
    MOST TALKED
    [2010-11-26]
    The enchanted forest- Fantasy photo manipulation
    Opinions : 77
    [2011-01-31]
    Create beautiful glowing flowers
    Opinions : 63
    [2010-12-06]
    The Winter Queen - Fantasy photo manipulation
    Opinions : 42
    [2010-03-15]
    Beautify a portrait
    Opinions : 40
    [2010-10-10]
    Create a beautiful emotional black and white love scene
    Opinions : 38
    [2010-07-06]
    Create beautiful golden skin effect using three different ways
    Opinions : 37
    [2010-08-22]
    Color blending collection I
    Opinions : 36
    [2010-12-15]
    Sweet red 3D love text effect
    Opinions : 35
    [2010-07-21]
    Vibrant and glamourous retouching
    Opinions : 34
    [2011-01-15]
    Color blending collection 3
    Opinions : 32
    RANDOM POSTS
    [2010-01-29]
    When i miss you
    [2010-11-14]
    Cool and realistic bubble text effect
    [2010-08-28]
    Create a beautiful illustrated sketch effect
    [2011-04-20]
    Free love icons
    [2010-02-02]
    A little flower
    MY FAVORITE SITES
  • PSD Tutsplus
  • FanExtra network
  • Webmaster tutorials
  • Typography resources
  • STATISTICS

    Total online: 4
    Guests: 4
    Users: 0
    Main » 2011 » July » 30 » Color blending collection IV


    10:57 PM
    Color blending collection IV
    Finally the 4th collection of color blending style is published. Hope you will like it as i do

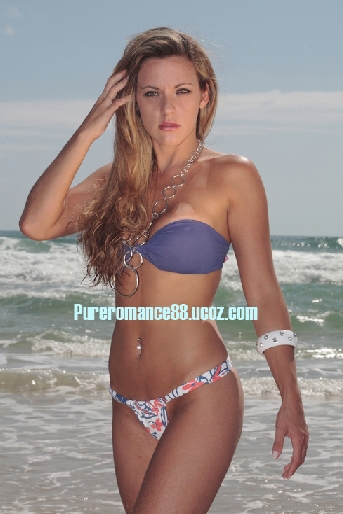
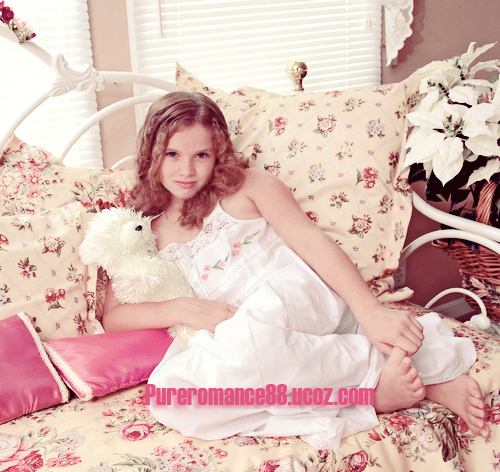
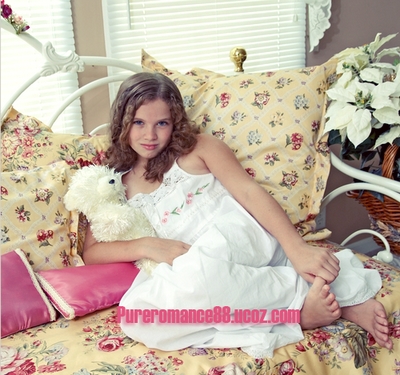
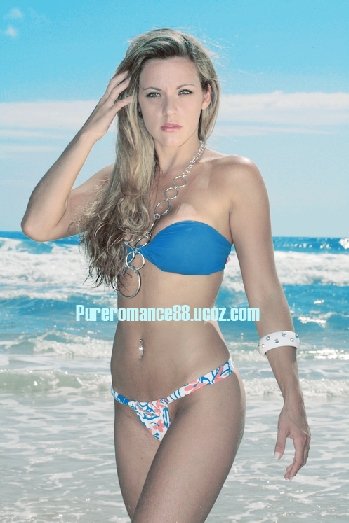
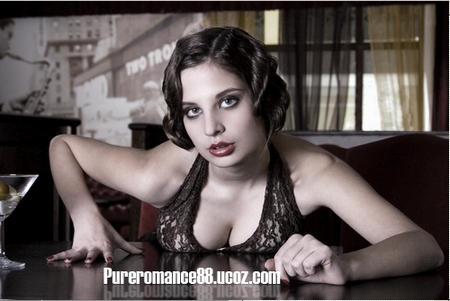
    I. Elegant soft pink tone:


    This effect is suitable for indoor portrait, without high contrast and  many dark tones. 
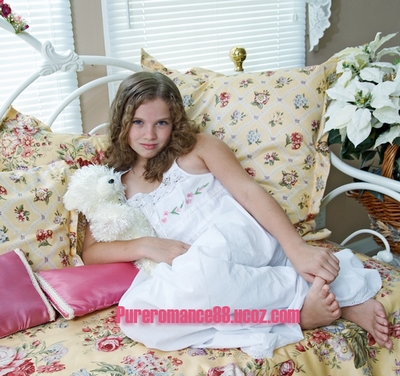
    Stock :

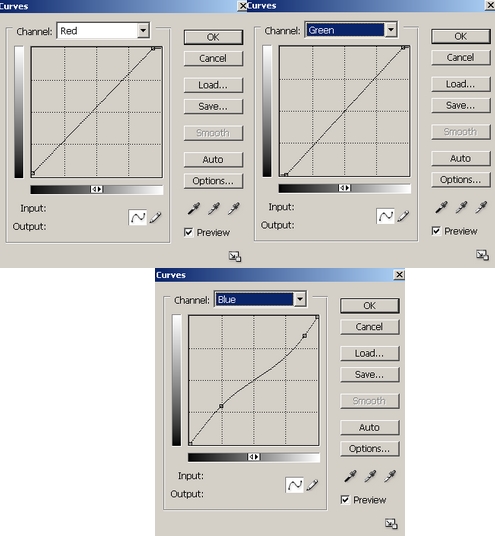
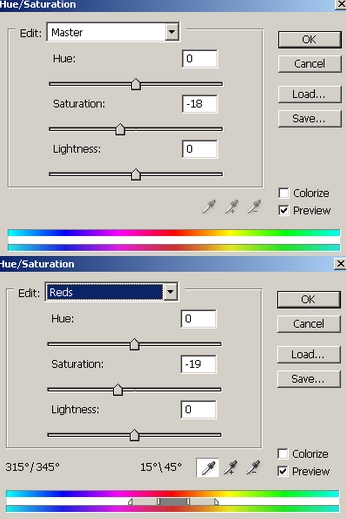
    1. Make two new Curves layer:
    Curves 1 to reduce red tone also increase cyan tone for picture:


    Curves 2 to add yellow tone and increase magenta tone:


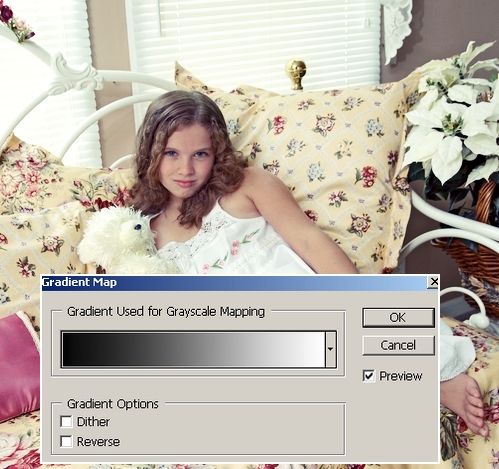
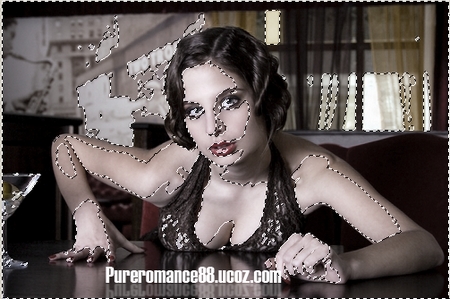
    2. Add a new Gradient Map layer, take color from black to white and set the mode to Soft light 70%. This makes picture brighter also increase a little contrast. Use soft black brush to eraser model:


    3. Add some adjustment layers to add more yellow tone for picture
    Selective Color : 
    Reds: -67, -63, -37, 44
    Whites: -11, 22, 51, 0
    Blacks: -13, -13, -12, 18

    Color Balance: 
    Midtones: -32, -42, -85
    Shadows: -30, -20, -15
    Highlights: 5, 5, 5


    4. In this step we will use two Selective color layers to change color from yellow to pink:
    Selective color 1:
    Reds: -15, 38, -38, 0
    Yellows: -50, -57, -40, -21
    Whites: -14, 17, -14, 70
    Neutrals: -16, 0, 0, 0
    Blacks: -16, 28, -11, 11

    Selective Color 2:
    Reds: -18, 31, 26, -32
    Yellows: -32, 10, -100, 0
    Whites: -53, -26, -51, -22
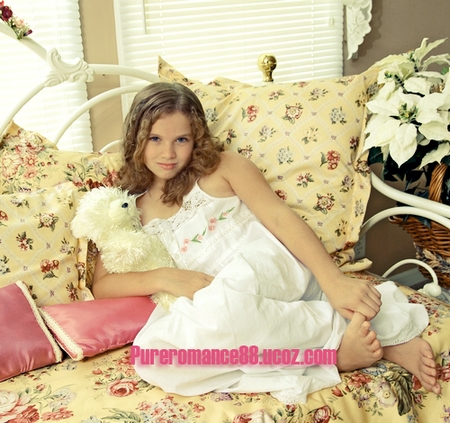
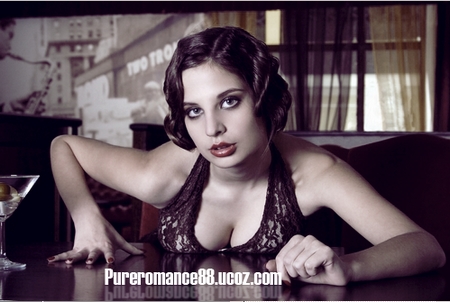
    Final Result:


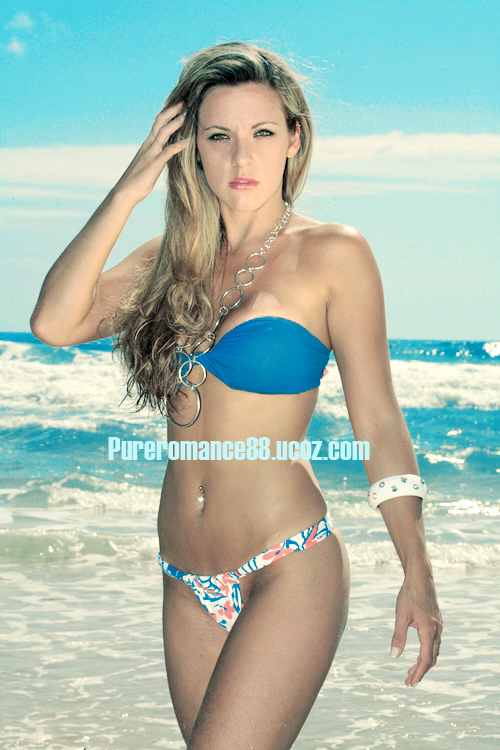
    II. Vibrant summer effect:
    In this tutorial we will turn a normal summer photo into a beautifully vibrant  one.


    Stock :

    1. First we will brighten picture. Check your picture if it is bright enough.
    Duplicate the background and set to Screen 50%. The value depends on the brightness of your own photo. 

    .

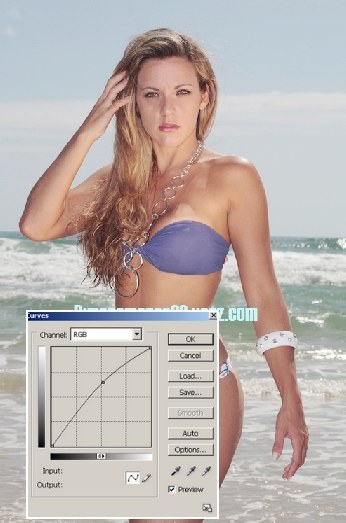
    Add a new Curves layer, move the RGB channel up a bit:


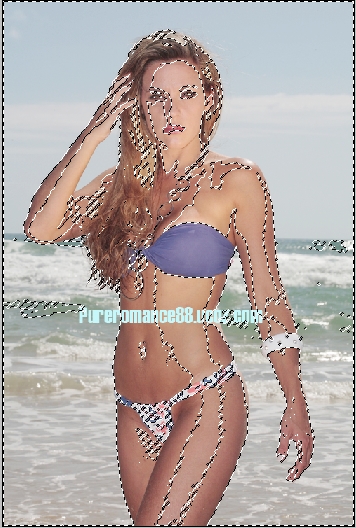
    2. Merge all layers. Hit Cmd/Ctrl+Alt+Shift+~ to load brightness of picture:


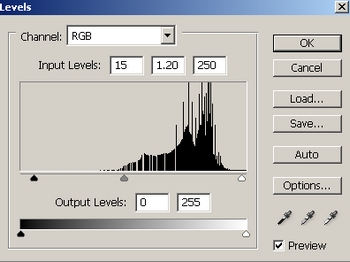
    Choose Layer-New adjustment layer-Levels:

    This step is to brighten, especially background a little:


    3. Make 3 new Selective Color  layers to make cyan, blue and green tone more vibrant also down the red tone on model skin:
    Selective Color 1:
    Reds: 35, -4, -14, -22
    Yellows: 82, 14, -9, 5
    Greens: 100, -100, -100, 0
    Cyans: 100, -100, -100, 100
    Blues: 100, 100, -100, 100
    Blacks: 11, 7, 14, 0

    Selective Color 2:
    Reds: -25, 3, 20, 0
    Yellows: 18, -19, -64, 0
    Greens: 100, 100, -100, 100
    Cyans: 100, 26, -100, 100
    Blues: 100, -39, -83, 37
    Neutrals: 21, 0, 0, 0

    Selective Color 3:
    Cyans: 100, -9, -100, 0
    Blues: 100, -22, 100, 0
    Neutrals: 13, 0, 0, -10
    Blacks: 0, 11, 10, -5


    4. Use two new Color Balance layers to add yellow light for picture, make it look gorgeous:
    Color Balance 1:
    Midtones: 25, 12, 15
    Shadows: -35, -8, 4
    Highlights: 11, 11, -3

    Color Balance 2:
    Midtones: 11, 5, -8
    Shadows: 10, 0, 0
    Highlights: 0, -3, -8
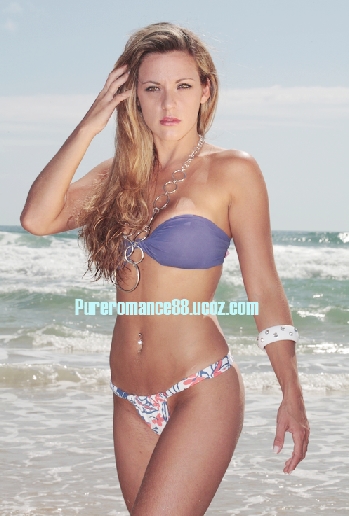
    Final Result:


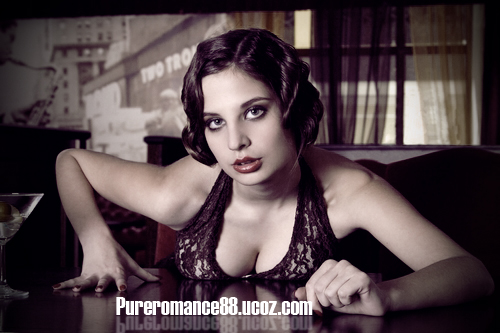
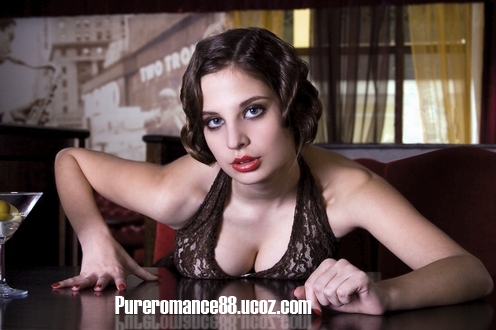
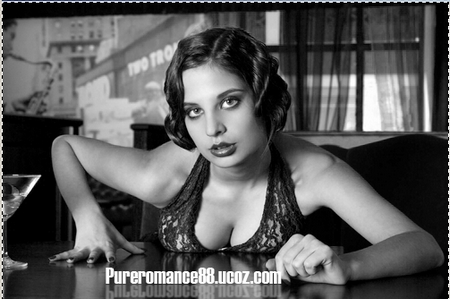
    III. Retro movie effect:


    Stock:

    1. Open picture and add a new Hue/Saturation layer to reduce saturation:


    2. Merge all layers. Choose Channels on Channel Pallete. Choose Blue channel, hit Cmd/Ctrl+A to make selection:


    Press Cmd/Ctrl+C to copy and Cmd/Ctrl+V to paste into RGB channels. Come back to Layer Pallete, then lower opacity to 50%:


    This step is to reduce saturation again.

    3. Hit Cmd/Ctrl+Alt+~ to load highlight of picture:


    Choose Layer-New adjustment layer-Selective color, adjust black channels to give picture dark purple tone.
    Blacks: -6, 21, -9, 6


    4. Add a new Photo Filter layer to make skin tone become warmer. 


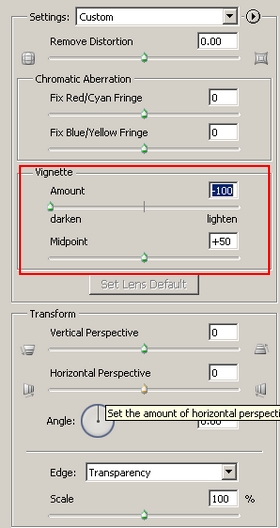
    5. We will add vignette effect to picture. Merge all layers, then choose Filter-Distort-Lens Corrections:


    Final Result:

    Views: 10367 | Added by: Admin | Tags: Portrait, color, vibrant, Soft, summer, Photoshop tutorial, Effect, photoshop, Photo effect, Pink

    ABOUT ME: I'm Jenny and i live in Hanoi, Vietnam. If you like what i write or want to keep in touch with me, you can subscribe to My blog, email me or become my friends on Facebook to keep updates of my latest works.

    All of the tutorials on my website may not be posted anywhere or translated into another languages without my written permission. Thank you!

    Share
    Share |
    Total opinions: 16
    0  
    1 bjnzzzle   (2011-08-02 8:58 AM)
    hello, how u doing? i really enjoy all your tuts. You should do more about blending photo. I believe that you know the website called Kenh14 right? there are a lot of ways blending photo in that website. I really like them. Thanks for your tut.

    0  
    5 Admin   (2011-08-06 6:18 PM)
    i know that site and i like pictures there wink . Thanks for reminding me tongue . I will do more blending collection when i have more time. Thanks for your time and viewing. Best wishes. wink

    0  
    2 Kattrina   (2011-08-02 7:08 PM)
    gOOD

    0  
    6 Admin   (2011-08-06 6:19 PM)
    Thanks biggrin

    0  
    3 khikon   (2011-08-03 11:59 AM)
    cam ơn chị rất nhìu ạ ^^

    0  
    7 Admin   (2011-08-06 6:19 PM)
    ko co gi em ^ ^

    0  
    4 msgriff   (2011-08-04 11:45 PM)
    Thanks for this tutorial! I have been looking for weeks trying to find information on tinting photos pink.
    Again, thanks.

    0  
    8 Admin   (2011-08-06 6:19 PM)
    im glad it was useful. Thanks or your footprint wink

    0  
    9 Rhea   (2011-08-23 5:00 PM)
    Hi Jenny, you are really awesome. Love your blending collection!

    0  
    10 Admin   (2011-09-03 11:59 PM)
    you're welcome :). Thanks for your kind words wink

    0  
    11 Nabeel Altamash   (2011-10-02 11:10 PM)
    These photos u blend is super spicy & seXy happy
    I LOV3 IT cool

    0  
    12 Admin   (2011-10-04 7:31 PM)
    i guess everyone likes looking at them and me too hehe biggrin tongue

    0  
    13 NTC   (2011-10-29 8:40 PM)
    Thanks, Chị là người Việt Nam ạ ?

    0  
    14 Admin   (2011-10-29 10:20 PM)
    Đúng đó em biggrin

    0  
    15 Hoang   (2012-03-30 10:43 PM)
    Thank for Sharing, nice to meet you !

    0  
    16 Admin   (2012-04-18 3:41 PM)
    you're welcome biggrin

    Something you should read before leaving your words:

    1. Pls use English or Vietnamese only which i can understand. Comments with another languages will be deleted.

    2. Pls be kind. You can say your own thinkings, opinions, ideas even negative ones, but i don't accept the rudeness or if you lack the respect to me and my readers.
    3. Pls don't use only emoticons or one word "hi" to represent your voice. All of such comments will be deleted. If you really want to say something, why don't leave more impressions?
    4. No spam, advertisement ( cheap host, back link...) or stuffs that are not relevant to me or my blog content. Comments are always pre-moderated so the spams will not get any chances to be published.
    5. Pls don't ask if they are not relevant to my blog content ( for example: ask me to help to do an effect on another site). I've been so busy so hard to follow such requests.
    6. Html code for comment board is disabled. So pls don't use it here. But if you want to leave the link of your site here, just do it with prefix http://. For example http://www.google.com. Is it simple, isn't it ?
    And now, have fun!


    Name *:
    Email:
    Code *:

    Copyright MyCorp © 2012
    Free web hosting - uCoz
    ?if()?>?endif?>2