Create a burning girl with fire effect - 14 June 2011 - Poetry, Writings, Art, Design
Thursday, 2012-05-17, 8:37 AM

Creativity comes from simplifying

Main | Registration | Login
Welcome Guest
RSS
MY TUTORIALS ON OTHER SITES
  • Create an emotional sunset photo manipulation

  • Create a cat in a magical pond scene photo manipulation

  • Create a surreal photo manipulation Coffee Mind

  • Create a Fantasy floating park photo manipulation

  • Twisting Water-Surreal photo manipulation

  • Firing Heart-Emotional photo manipulation

  • Create a dramatic building explosion scene

  • Let me sink-Emotional rainy scene photo manipulation

  • Create a colorful and furistic photo manipulation

  • The Sky Station - Surreal photo manipulation

  • The Vampire Hunter - Dark photo manipulation

  • Dark storm scene photo manipulation

  • The Released - Dark and surreal photo manipulation

  • Wounded rose - Create an abstract photo manipulation

  • Create a dark and emotional photo manipulation

  • Create a dramatic battle scene in photoshop

  • The Forgotten - Dark an conceptual photo manipulation

  • Night's butterfly-Create a dark and mysterious fantasy portrait

  • Create an anti-smoking concept design in photoshop

  • A dreamy world-Create a fantasy landscape

  • Create a dramatic action scene poster

  • Create a nature inspired, out of bound photo effect in photoshop

  • Cool metal text effect

  • Dance in blue - Fantasy photo manipulation

  • Emotional night scene - Photo manipulation

  • Create a lovely 3D like butterfly in Photoshop

  • Create a beautiful Valentine background with moon and heart

  • Create a beautiful and romantic Valentine wallpaper

  • Beautiful pink flower portrait

  • Create a beautiful spring greeting card in photoshop

  • Beautiful spring-Fantasy photo manipulation

  • Cool floral 3D text effect

  • Colorful bokeh heart effect

  • Retro artistic effects

  • Sexy ghost in the uninhabited house-Dark photo manipulation

  • Colorful and glamour composition style in photoshop

  • Glowing text in colorful fantastic space scene

  • Magical blossom dance-Fantasy photo manipulation

  • RECENT TALKS


    TAGS
    Bokeh wallpaper spring pattern Photo manipulation Snow glowing images Heart Text effect Design model Surreal GHost girl room Pink Emotional frame Photo effect season Nature Random thoughts vibrant color Memory abstract My story Beautiful girl Asadal special effect drawing Creative Strength Hurt sparkling painting valentine background colorful Winter red Mood Effect rose Fantasy Misc Blood summer Sky missing graphics Penelope Cruz Feeling romantic Portrait photoshop FLY gif My poetry green flower photo Splatter Wind Beauty Dreamy Autumn dark photos Life music Calligraphy yellow Photo retouch Soft glitter Skin vector Beautiful script BANNER Rain icon font Patter NIGHT Mandy Moore Inspiration Woman Photoshop tutorial love Forest light Blend Fonts butterfly Blue Sweet Stock
    ARCHIEVES
    SEARCH


    RECENT POSTS
    [2012-03-07]
    Create a Nature themed, Astract photo manipulation
    [2011-10-29]
    The Mirror - Dark and horror photo manipulation
    [2011-07-30]
    Color blending collection IV
    [2011-06-20]
    Give your ordinary portrait photo glamorous effect with charming make-up
    [2011-06-14]
    Create a burning girl with fire effect
    MOST POPULAR
    [2010-07-26]
    Complete portrait retouching
    Views: 42686
    [2010-11-26]
    The enchanted forest- Fantasy photo manipulation
    Views: 39680
    [2011-01-31]
    Create beautiful glowing flowers
    Views: 35291
    [2011-01-15]
    Color blending collection 3
    Views: 34515
    [2010-08-22]
    Color blending collection I
    Views: 29821
    [2010-10-27]
    Create a model look with naturally perfect skin
    Views: 27797
    [2010-05-29]
    Enhance portrait photo with natural look
    Views: 27345
    [2010-11-15]
    25 beautiful dreamy effect photoshop tutorials
    Views: 26575
    [2010-09-14]
    Soft and dreamy movie effect
    Views: 25959
    [2010-03-15]
    Beautify a portrait
    Views: 25452
    MOST TALKED
    [2010-11-26]
    The enchanted forest- Fantasy photo manipulation
    Opinions : 77
    [2011-01-31]
    Create beautiful glowing flowers
    Opinions : 62
    [2010-12-06]
    The Winter Queen - Fantasy photo manipulation
    Opinions : 42
    [2010-03-15]
    Beautify a portrait
    Opinions : 40
    [2010-10-10]
    Create a beautiful emotional black and white love scene
    Opinions : 38
    [2010-07-06]
    Create beautiful golden skin effect using three different ways
    Opinions : 37
    [2010-08-22]
    Color blending collection I
    Opinions : 36
    [2010-12-15]
    Sweet red 3D love text effect
    Opinions : 35
    [2010-07-21]
    Vibrant and glamourous retouching
    Opinions : 34
    [2011-01-15]
    Color blending collection 3
    Opinions : 32
    RANDOM POSTS
    [2010-03-26]
    Cyan tone in photoshop
    [2010-11-05]
    Glowing flowers - My new drawing
    [2010-08-01]
    Unknown heart
    [2010-03-11]
    Romantic blue background
    [2010-02-03]
    A part of memories...
    MY FAVORITE SITES
  • PSD Tutsplus
  • FanExtra network
  • Webmaster tutorials
  • Typography resources
  • STATISTICS

    Total online: 1
    Guests: 1
    Users: 0
    Main » 2011 » June » 14 » Create a burning girl with fire effect


    11:40 AM
    Create a burning girl with fire effect
    In this tutorial you will learn how to create a burning girl with fire effect. We will come through easy steps to create this cool effect using only default filters, color and brushes of photoshop. 


    Stock:

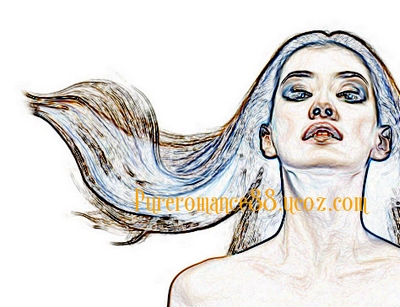
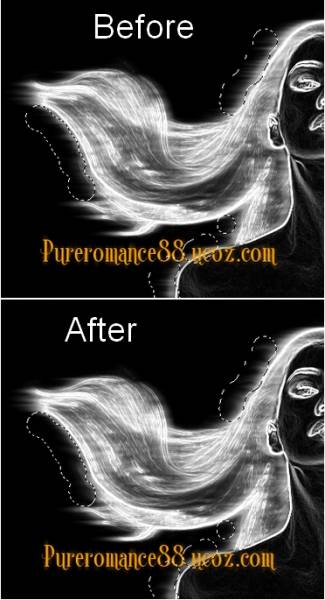
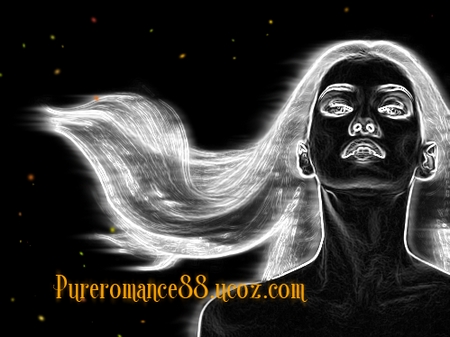
    1. Open your picture and duplicate it we have Background copy. You better choose model with flying hair so effect will look nicer. Choose Filter-Stylize-Find edges:


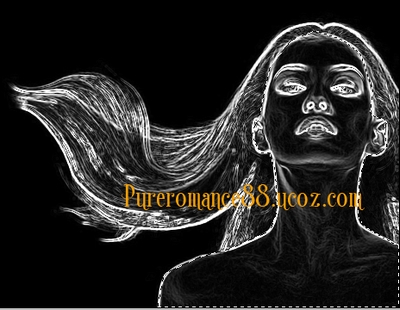
    2. Press Ctrl+Shift+U to desaturate it, then hit Ctrl+I to invert color. We have result:


    3. Make a selection around face, neck, body except hair, then copy it into a new layer ( right click this selection, choose Layer via Copy to use Ctrl+C to copy, Ctrl+V to paste):


    This step is to make face, body of girl on a new layer so when we apply effect in following step these part will not be affected.

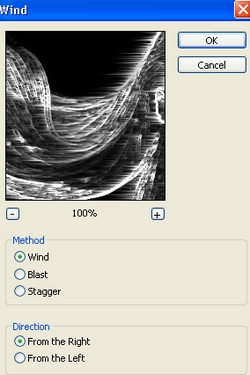
    4. Duplicate background copy ( that has been applied some effects in previous steps). Choose Filter-Stylize-Wind. 
    My model hair is flying hair from the right so i choose From the Right like in this screenshot:


    Depending on your model hair direction you can choose like me or in contrary side or choose both.

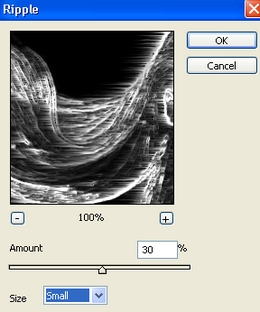
    Apply Ripple effect ( Filter-Distort-Ripple):


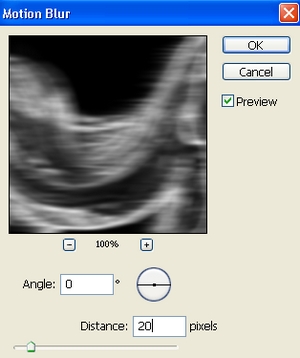
    Apply Gassian Blur with 1 px, then Motion blur:


    Set this layer to Screen 100%.


    Duplicate it and lower opacity to 50% ( with Screen mode):


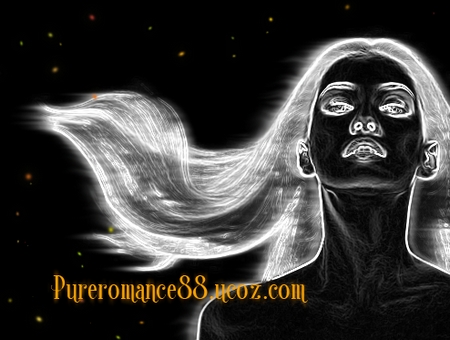
    5. Now we will use Smudge tool to make fire look more realistic. Create a new layer , choose Smudge tool:

    Drag fire lines to make them look smoother:


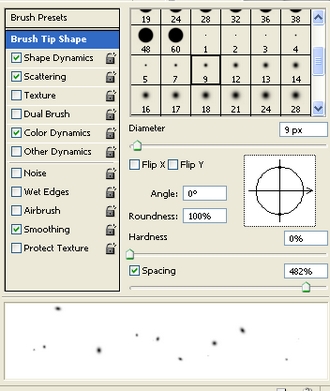
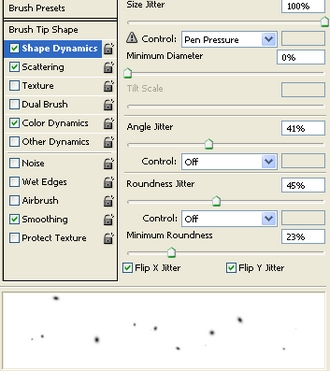
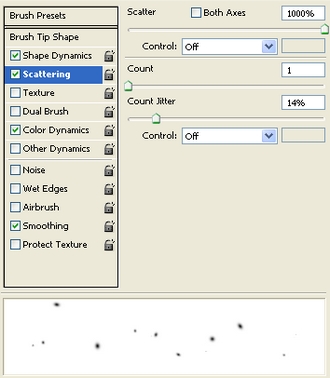
    6. Create a new layer, choose soft brush, 9 px and color #faa203 with settings:


    Paint around model like this:
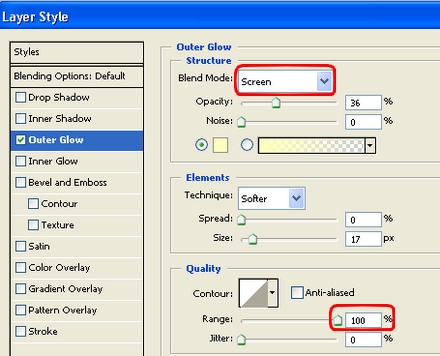

    Apply Outer glow:


    7. New layer again, use soft brush, 4 px, uncheck Color Dynamics on brush settings and draw around model ( dont apply layer style):


    Step 6, 7 are to create fire spots.

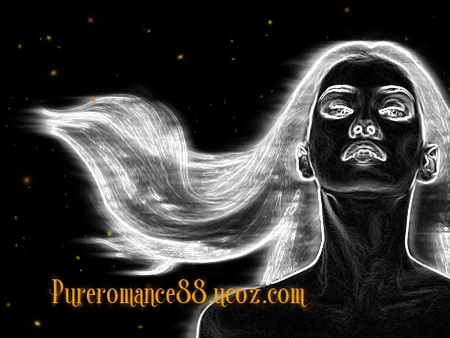
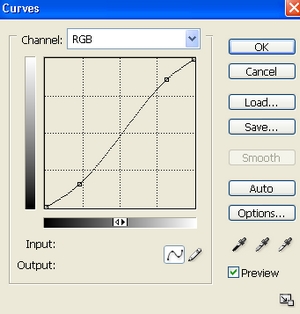
    8. Create a new Color Balance layer ( Layer-New adjustment layer-Color Balance):
    Midtones: 60, 13, -89
    Shadows: 63, 25, -57
    Highlights: 71, 0, -43


    Curves layer to make more contrast:
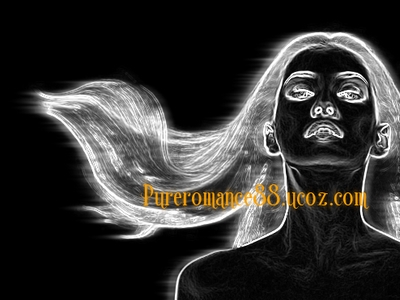

    We have result:


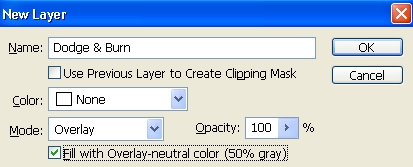
    9. Final step: Create a new layer with Overlay mode, fill with 50% gray:


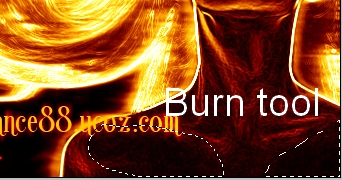
    Use Dodge tool to brighten more highlights and Burn tool to strengthen dark parts on model  
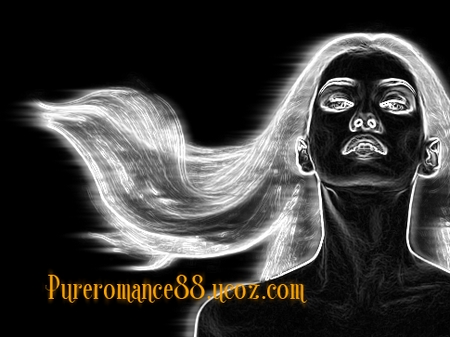
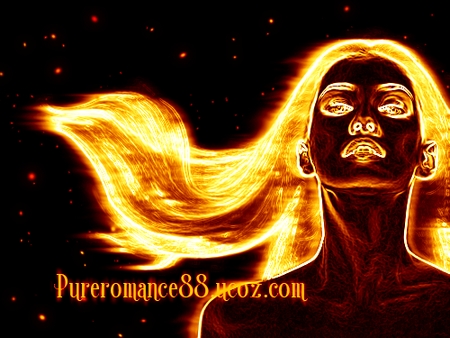


    Final Result:

    Views: 23065 | Added by: Admin | Tags: Effect, photoshop, Photo effect, Photoshop tutorial, girl, special effect, fire, Beauty, Portrait, Burning

    ABOUT ME: I'm Jenny and i live in Hanoi, Vietnam. If you like what i write or want to keep in touch with me, you can subscribe to My blog, email me or become my friends on Facebook to keep updates of my latest works.

    If you like this post, pls share it! Thank you!

    Share
    Share |
    Total opinions: 25
    0  
    1 Christine   (2011-06-15 9:32 AM)
    wow nice happy

    0  
    2 Rina   (2011-06-17 9:31 AM)
    Love it! Thanks! biggrin

    0  
    3 Admin   (2011-06-17 5:22 PM)
    You're welcome! wink

    0  
    4 Jack   (2011-06-17 8:00 PM)
    Good effect with no unwanted flames, Subject looks clear, and i have came across same kind of effect in few blogs where they mess the subject with extra unwanted effect, it will looks like over effect too. But this one looks perfect to me. You have used exact amount of technique what is needed here and off course with your wonderful explanation which you always in first place.

    Thanks for wonderful effects and expecting some more good tutorials from you.

    -----------------------------------------------
    http://www.deepetch.com
    Clipping path service and more...

    0  
    6 Admin   (2011-06-17 11:22 PM)
    I think its not really perfect and i hoped i could remake it better :(. But thanks a lot for your wonderful words as well as your kind will for me and my page. Im really touched by it, appreciate it wink . Thank you again and i hope everything always go on as you wish wink

    0  
    5 evans   (2011-06-17 10:02 PM)
    hey, u r good.
    I love your work.
    have you ever done a skin bleach effect? the one you make a dark person look really white? i av tried other tuts but they dont give me the result i want. any kind of help will be highly appreciated

    Please help,

    thanks in advance wink

    0  
    7 Admin   (2011-06-17 11:26 PM)
    No, i've never tried this effect so i really dont know how to do it clearly. Maybe i will try it one day wink . Thanks for your footprint and comment wink

    0  
    8 praveen   (2011-06-18 10:29 AM)
    Thank u

    0  
    13 Admin   (2011-07-05 11:20 AM)
    no problem biggrin wink

    0  
    9 Vanessa   (2011-06-20 3:19 AM)
    Hey girl! I want to say this is a really great tutorial! You are the first one who explains it very well and in just a few steps! I have seen this effect before but most are making it so complicated by adding like 50 steps or something. But you created the same effect in just a few minutes. I tried it out and love it biggrin
    Keep up the great work!!! I use photoshop for years now and still look for some tutorials to keep me busy. I check out your other tutorials ±D

    0  
    14 Admin   (2011-07-05 11:23 AM)
    really? im not sure about it as there are many great tutorials about fire wink . Haha but thank you very much for supportive words, i really appreciate it wink . I've always tried to simplify everything and hope everyone can follow what i've shared. Its always pleasure to know its helpful to people. Thank you a lot wink

    0  
    10 baron13   (2011-06-28 8:40 PM)
    nic

    0  
    11 USA Free Driving Online Test   (2011-07-01 11:36 PM)
    Good tutorials thanks for sharing
    Joe
    www.ezdrivingtest.com (Free Online Portal to prepare for USA Driving written test)

    0  
    12 Menrich Brother   (2011-07-03 3:50 AM)
    Hello, this is a great tutorial! This is my Picture: http://menrichbrother.deviantart.com/#/d3krjqp

    0  
    15 Admin   (2011-07-05 11:23 AM)
    its really nice one, thank you for sharing this result ! wink

    0  
    16 Jokethraman   (2011-07-14 12:31 PM)
    How to color change
    Midtones: 60, 13, -89
    Shadows: 63, 25, -57
    Highlights: 71, 0, -43

    Explani for my id this is my id V.Jayam91@gmail.com

    0  
    18 Admin   (2011-07-21 11:19 PM)
    Choose Layer-New adjustment layer-Color Balance wink

    0  
    17 Junaedy Ponda   (2011-07-19 7:28 AM)
    Really awesome effect happy

    0  
    19 Admin   (2011-07-21 11:19 PM)
    Thanks tongue biggrin

    0  
    20 Rhoden   (2011-07-22 9:45 AM)
    WoW.... I must try this once I get home. Wish me luck.

    As always good job Jenny! <3

    0  
    21 Admin   (2011-07-30 11:09 PM)
    haha all the best to you biggrin tongue . Thanks always Rhoden wink , you are always very nice xx

    0  
    22 Abdo   (2011-08-19 9:25 PM)
    cooool...

    u r so preliant...

    0  
    23 Admin   (2011-08-19 11:57 PM)
    thanks wink

    0  
    24 Cj walker   (2011-10-11 8:23 AM)
    Thanks for the tut! I tried to follow you're exact steps but mine came out a little funny looking. But I'll keep trying. Thanks hottie!

    http://www.SBmingledesigns.com

    0  
    25 Admin   (2011-10-26 6:13 PM)
    you're welcome, im glad you like it wink

    Something you should read before leaving your words:

    1. Pls use English or Vietnamese only which i can understand. Comments with another languages will be deleted.

    2. Pls be kind. You can say your own thinkings, opinions, ideas even negative ones, but i don't accept the rudeness or if you lack the respect to me and my readers.
    3. Pls don't use only emoticons or one word "hi" to represent your voice. All of such comments will be deleted. If you really want to say something, why don't leave more impressions?
    4. No spam, advertisement ( cheap host, back link...) or stuffs that are not relevant to me or my blog content. Comments are always pre-moderated so the spams will not get any chances to be published.
    5. Pls don't ask if they are not relevant to my blog content ( for example: ask me to help to do an effect on another site). I've been so busy so hard to follow such requests.
    6. Html code for comment board is disabled. So pls don't use it here. But if you want to leave the link of your site here, just do it with prefix http://. For example http://www.google.com. Is it simple, isn't it ?
    And now, have fun!


    Name *:
    Email:
    Code *:
    Copyright MyCorp © 2012
    Free web hosting - uCoz
    ?if()?>