Wednesday, 2024-04-24, 0:33 AM

My photoshop tutorials and writings

Main | Registration | Login
Welcome Guest
RSS
MY TUTORIALS ON OTHER SITES
  • Create a fantasy landscape matte painting with Photoshop

  • Create an abstract sci-fi scene with Photoshop

  • How to paint a woman portrait from scratch

  • Turn an ordinary photo into a fantasy one

  • How to paint a fantasy woman portrait with Photoshop

  • Create a haunted house scene with Photoshop

  • Create a sunset landscape photo manipulation

  • Forgotten Halloween-Dark photo manipulation

  • Turn a portrait into a zombie

  • Create a dark, emotional fallen angel scene

  • Create a deer abstraction with Photoshop

  • My interview

  • Create a fantasy fish scene above the sky

  • Apply two retro effects to your photos

  • Red Dream - Emotional photo manipulation

  • Create an anti-alcohol concept artwork with Photoshop

  • How to change the light and mood of your landscape photos

  • Create a photo manipulation of an emotional dancer in a forest

  • Create the wondefully colorful fantasy photo manipulation Everlasting Dream

  • Create a dark forest scene with a young witch photo manipulation

  • Retouch a model with Photoshop

  • Create the abstract photo manipulation Imperfection

  • Create a beautiful sunrise landscape photo manipulation

  • Create a dark abstract crow photo manipulation

  • Create a fantasy underwater scene with photoshop

  • Create a fashion mixed media portrait with photoshop

  • Create a surreal, emotional underground scene photo manipulation

  • Create a fantasy tree woman scene in photoshop

  • Create an intense fallen angel scene in photoshop

  • Create a fantasy fiery portrait photo manipulation

  • Create a surreal underground scene with a sleeping, frozen beauty

  • Create a winter night landscape photo manipulation

  • Create an emotional autumn scene photo manipulation

  • Create a creepy abstract flaming tree woman in photoshop

  • Create a fantasy boat scene photo manipulation

  • Create a devil woman scene using digital painting techniques

  • Create a beautiful sunrise scene with an old house

  • Create a dark grim reaper scene photo manipulation

  • Create a dark forest scene photo manipulation

  • Create a spring-inspired watercolor artwork in photoshop

  • Create a misty landscape matte painting in photoshop

  • Create a surreal head with rose photo manipulation

  • Create a fantasy photo manipulation "Summoning The Power"

  • Create a lonely child scene photo manipulation

  • Create a serene lake scene photo manipulation

  • Create a dark photo manipulation of a devil woman

  • Design a summer time vacation poster

  • Create a space battle scene in Photoshop

  • Create a garden scene with a cat gazing at a fish cloud

  • Create a beautiful mixed media portrait in photoshop

  • Create a bunny house in photoshop

  • Create a Surreal Head Of Tree Photo Manipulation

  • Create a Dark and Surreal Photo Manipulation "Volcano Spirit"

  • Create a Mysterious and Fantasy Woman Portrait in Photoshop

  • Create a Snowy Night Landscape Matte Painting

  • Create a Christmas night landscape photo manipulation

  • Create a colorful photo manipulation "Simple Life"

  • Create a fantasy forest fire scene photo manipulation

  • Create a floating superhero scene with sci-fi lighting effect

  • Create a Beautiful Abstract Cosmic Photo Manipulation

  • Create a Nature Inspired Advertisement Design

  • Create a Dark Ghostly Scene Photo Manipulation

  • Create a Fantasy Witch Scene Photo Manipulation

  • Create a fantasy halloween witch cat photo manipulation

  • Create a beautiful sunrise landscape matte painting in photoshop

  • Create a Surreal Photo Manipulation "Flooded"

  • Create a Surreal Portal Scene with Powerful Lighting effect

  • Create a Sci-fi photo manipulation "Space Station"

  • Create emotional photo manipulation "Magical Rose"

  • Create An Eerie Abstract Photo Manipulation

  • Create a Surreal Photo Manipulation Sky Gate

  • Create a Fantasy Mushroom House Photo Manipulation

  • Create a Surreal Photo Manipulation "Daydream"

  • Create a Dark Photo Manipulation "Nocturna"

  • Create an emotional sunset photo manipulation

  • Create a cat in a magical pond scene photo manipulation

  • Create a surreal photo manipulation Coffee Mind

  • Create a Fantasy floating park photo manipulation

  • Twisting Water-Surreal photo manipulation

  • Firing Heart-Emotional photo manipulation

  • Create a dramatic building explosion scene

  • Let me sink-Emotional rainy scene photo manipulation

  • Create a colorful and futuristic photo manipulation

  • The Sky Station - Surreal photo manipulation

  • The Vampire Hunter - Dark photo manipulation

  • Dark storm scene photo manipulation

  • The Released - Dark and surreal photo manipulation

  • Wounded rose - Create an abstract photo manipulation

  • Create a dark and emotional photo manipulation

  • Create a dramatic battle scene in photoshop

  • The Forgotten - Dark an conceptual photo manipulation

  • Night's butterfly-Create a dark and mysterious fantasy portrait

  • Create an anti-smoking concept design in photoshop

  • A dreamy world-Create a fantasy landscape

  • Create a dramatic action scene poster

  • Create a nature inspired, out of bound photo effect in photoshop

  • Cool metal text effect

  • Dance in blue - Fantasy photo manipulation

  • Emotional night scene - Photo manipulation

  • Create a lovely 3D like butterfly in Photoshop

  • Create a beautiful Valentine background with moon and heart

  • Create a beautiful and romantic Valentine wallpaper

  • Beautiful pink flower portrait

  • Create a beautiful spring greeting card in photoshop

  • Beautiful spring-Fantasy photo manipulation

  • Cool floral 3D text effect

  • Colorful bokeh heart effect

  • Retro artistic effects

  • Sexy ghost in the uninhabited house-Dark photo manipulation

  • Colorful and glamour composition style in photoshop

  • Glowing text in colorful fantastic space scene

  • Magical blossom dance-Fantasy photo manipulation

  • RECENT TALKS
    I am impressed with

    superbe vos tutos tr


    Nice site. On your b

    hi.
    just wond

    Helpful and easy to

    ARCHIEVES
    >


    RANDOM PHOTOS
    RECENT POSTS
    [2014-03-06]
    My first brush sets
    [2013-07-19]
    Free abstract wing and light stocks
    [2013-06-21]
    Free sci-fi grid backgrounds
    [2013-05-21]
    Free star backgrounds
    [2013-03-07]
    Create a colorful abstract cosmic photo manipulation
    MOST POPULAR
    [2010-07-26]
    Complete portrait retouching
    Views: 123218
    [2011-01-31]
    Create beautiful glowing flowers
    Views: 102500
    [2010-11-15]
    25 beautiful dreamy effect photoshop tutorials
    Views: 99469
    [2010-11-26]
    The enchanted forest- Fantasy photo manipulation
    Views: 93478
    [2012-03-07]
    Create a Nature themed, Astract photo manipulation
    Views: 86140
    [2010-08-22]
    Color blending collection I
    Views: 82304
    [2012-05-20]
    On My Road - Surreal Photo Manipulation
    Views: 79425
    [2010-03-15]
    Beautify a portrait
    Views: 71294
    [2011-06-14]
    Create a burning girl with fire effect
    Views: 68054
    [2010-09-14]
    Soft and dreamy movie effect
    Views: 65469
    MOST TALKED
    [2014-03-06]
    My first brush sets
    Opinions : 129
    [2011-01-31]
    Create beautiful glowing flowers
    Opinions : 88
    [2010-11-26]
    The enchanted forest- Fantasy photo manipulation
    Opinions : 80
    [2011-05-10]
    Chocolate skin effect
    Opinions : 61
    [2010-12-06]
    The Winter Queen - Fantasy photo manipulation
    Opinions : 44
    [2010-03-15]
    Beautify a portrait
    Opinions : 43
    [2010-12-15]
    Sweet red 3D love text effect
    Opinions : 42
    [2010-10-10]
    Create a beautiful emotional black and white love scene
    Opinions : 41
    [2010-07-06]
    Create beautiful golden skin effect using three different ways
    Opinions : 40
    [2010-08-22]
    Color blending collection I
    Opinions : 40
    RANDOM POSTS
    [2010-03-30]
    Dreamy effect - Part I - Fantastic mist
    [2010-03-22]
    Shiny skin effect
    [2010-01-31]
    Beautiful spring
    [2010-05-08]
    Love song in the mysterious night
    [2010-11-14]
    Cool and realistic bubble text effect
    [2010-05-03]
    Create a painting effect in photoshop
    [2010-12-06]
    The Winter Queen - Fantasy photo manipulation
    [2010-02-11]
    Love of the leaves
    MY FAVORITE SITES
  • PSD Tutsplus
  • Webmaster tutorials
  • Typography resources
  • SEARCH
    TAGS
    Life Random thoughts angel Rain missing love Feeling My poetry Heart Nature spring color Autumn Winter My story Photoshop tutorial Photo effect Blend Photo retouch NIGHT Woman Portrait light red Blue Effect Dreamy Soft Bokeh Photo manipulation Emotional Beauty dark girl HOUSE photoshop flower drawing Fantasy Forest Snow petal Sky butterfly Surreal Hurt Blood Dream Broken fire Creepy abstract rose photo manipulation surreal planet freebie Stock Space Cosmic colorful star background Sci-Fi WING lake Pain cat magic Sunset devil UnderWater landscape Matte Painting Witch Halloween power Sun sea head garden child tree Boat grass leaves sleeping branc Crow Feather Flying Rock Mountain Goddess Castle Nebula fairy Glow Knight asteroid Waiting
    STATISTICS

    Total online: 1
    Guests: 1
    Users: 0
    Main » 2011 » May » 28 » How to retouch photos with color cast


    11:48 AM
    How to retouch photos with color cast
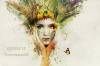
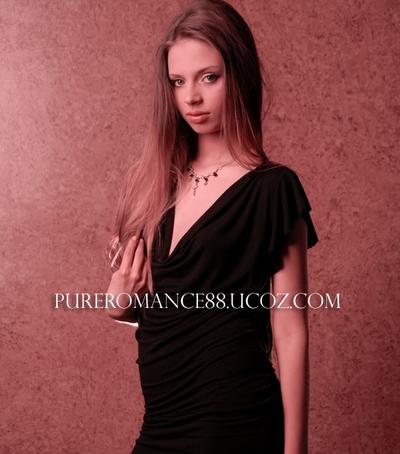
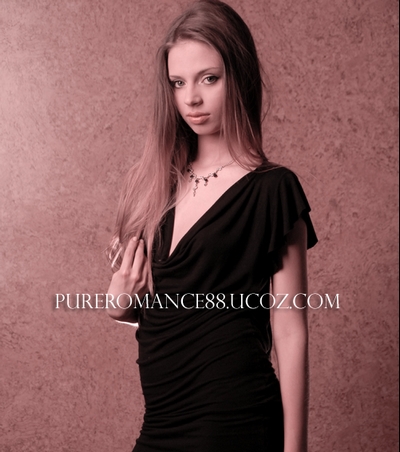
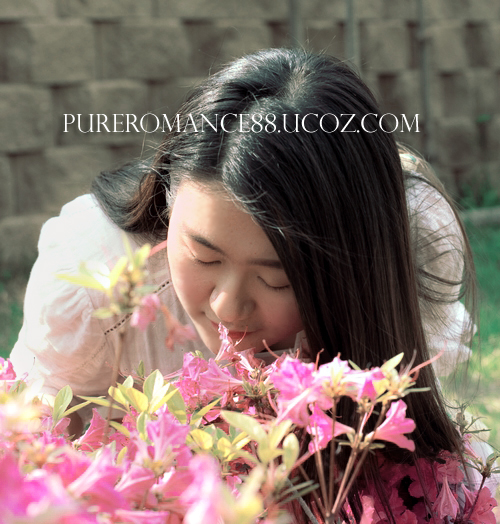
    I've received lots of emails asking how to retouch a photo with color cast. So today i make two detailed tutorials with some tips and hope that it will be useful for you. I  use two pictures from photoxpress.com to illustrate the process.

      I. Retouch  photo with yellow cast:


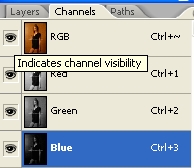
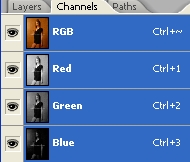
    1. Open your stock and duplicate it. Choose Channels on Layer Pallete: 


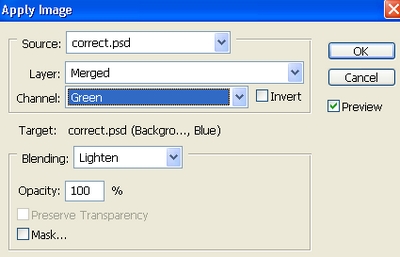
    Choose Blue channel also turn on RGB channels. By this way you can see how picture changes from applying effect on each channel:

    On Blue channel choose Edit-Apply image. Apply Lighten mode on Green channel:


    We have:


    Remember that if you choose Green channel on Channel Pallete, then apply image with Lighten mode, the result will be totally different.

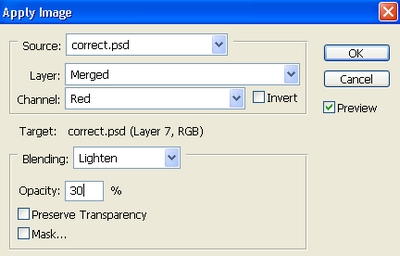
      2. Hit Ctrl+Shift+Alt+E to merge all layers. Choose Image- Apply Image. I choose Red channel for Lighten mode with opacity 30% as it can brighten picture and reduce saturation:


    3. Create a new Selective color layer ( Layer-New adjustment Layer-Selective Color):
    Reds: 40, -6, 22, 0

    This step is to reduce red and magenta tone on whole picture. You can use Hue/Saturation layer to get similar result ( adjust Red and Magenta channel):


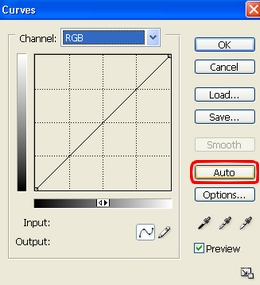
    4. In this step we will use Auto Curves to correct the light and change the tone of this photo. Create a new Curves layer, choose Auto:


    This option sets the change of channels as shown below:


    You can see lots of difference here:


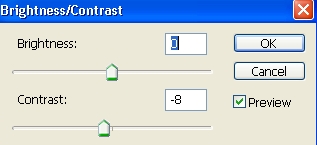
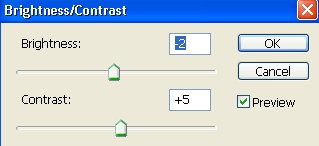
    5. Make a new Brightness/Contrast layer, i want to reduce  the contrast:


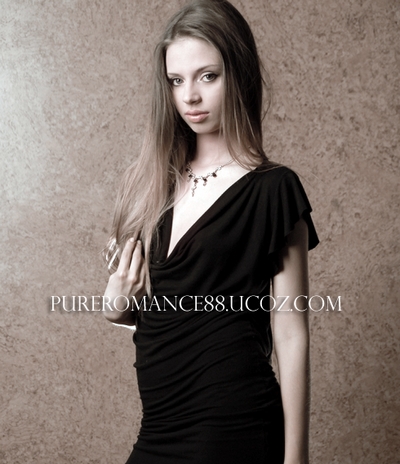
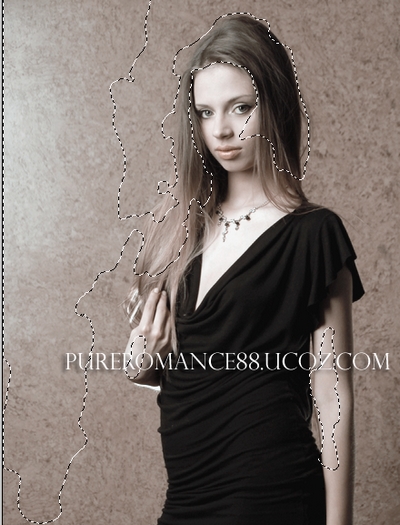
    6. You can stop here if its the color you want. But remember after correcting color of whole picture, there maybe some unwanted color parts, on background, skin or clothes of model. One of my favorite methods, also its one of simplest and easiest way to fix it is to use soft brush with color picked by Eyedropper tool ( I ) . 

    With this model, for difference colors cast on background, skin, body, we will use some separate layers with different modes.

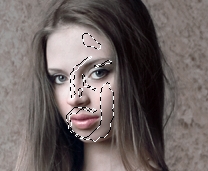
    We see some cyan color on background, model hair, hands.

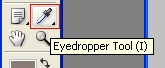
    Create a new layer with Color mode 100%. Grab Eyedropper Tool ( I ) then click on picture part to choose color you want to apply with. . I choose color of background:


    After clicking, foreground color is changed to #8a7d75 . Use soft brush, 60-70 px ( depends on the size of your picture, remember to vary brush diameter, opacity and flow to fit the size of color parts you want to fix) to paint on the parts shown in a previous screenshot:

    In this example, i use brush opacity 100% for background, opacity 50% for model:


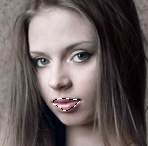
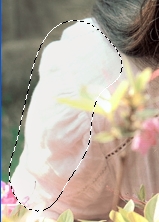
    7. Now we will fix overexposed parts of skin on face, neck, shoulder and breast. Use Eyedropper tool to pick color on model face:

    We have color #bfa49a picked on foreground. Use soft brush to paint on selected part shown in previous screenshot then set this layer to Multipy 50%:


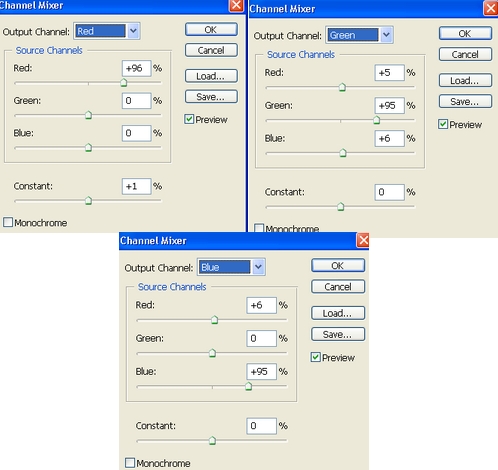
    8. I add some new adjustment layers to make picture look more vibrant and make model standing out from background.

    First i use Channel Mixer and Selective color to add more light pink tone for the whole picture:
    Channel Mixer:


    Selective Color:
    Reds: -59, -2, 13, 21
    Yellows: 61, 23, 0, 100


    Then i use Color Balance and Selective Color again to add light cyan tone for background, also make model dress have a luxurious dark cyan tone:

    Color Balance:
    Midtones: -4, 0, 9
    Shadows: -11, 1, 9
    Highlights: -5, 0, 3

    Selective Color:
    Reds: 12, 8, 33, 0
    Cyans: 100, 38, -23, 0
    Neutrals: 6, 0, 0, 0
    Whites: 9, 0, 0, 0


    9. Now we will do retouch on model. I want to add more vitality for skin. Create a new layer, use color #fed2d2 to paint on skin parts. Set this layer to Color 20%:


    New layer again, use soft brush, color #ffc3d0 to paint on lips. Set this layer to Color 100%:


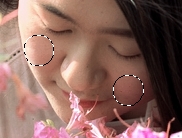
    Use soft brush. color #ffbfbf on a new layer to paint on cheeks. Set mode to Color 60%:


    10. New layer, choose Blur tool ( R) with setting as below to paint over skin part that you want to soften. You can skip this step if you feel your model skin is enough smooth.

    After this step, we have result:


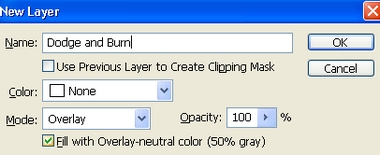
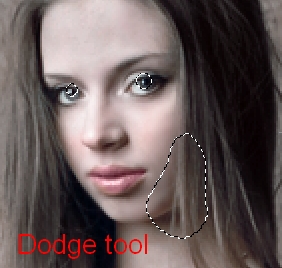
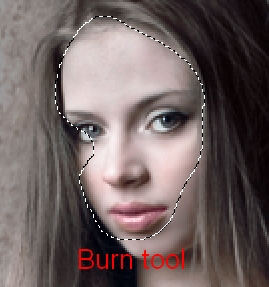
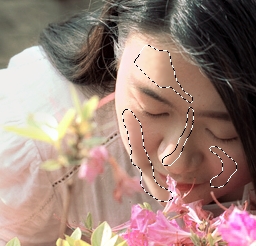
    11. In this step we will use Dodge and Burn to retouch model face. As you know i always use a new layer with Overlay mode, fill with 50% gray:

    I use Dodge tool ( Midtones range , Exposure about 15-20% to brighten irises, cheek sides:


    I use Burn tool with Midtones range, Exposure 15-20% to darken cheeks, forehead, eyes, lips,  reduce highlight on nose bridge:


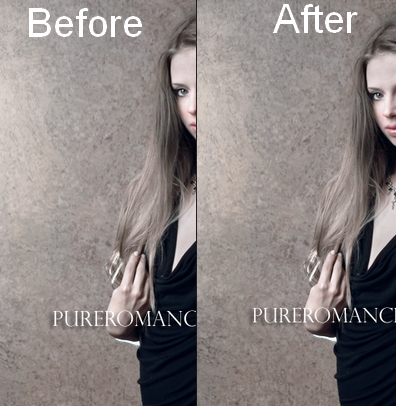
    You can notice some differences before and after this step:


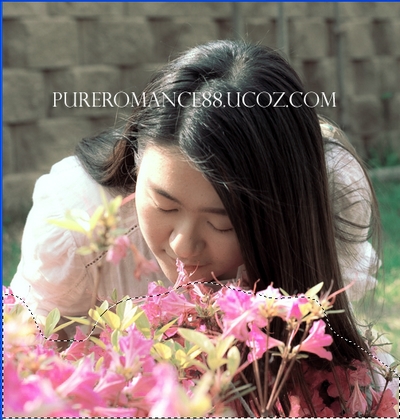
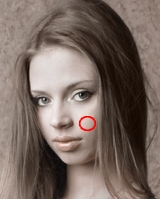
    12. Final touch: Merge all layers. Use Lasso tool to make a selection on a background part that i want to reduce highlight, set feather = 40 ( depends on the size of your picture and part you want to fix):


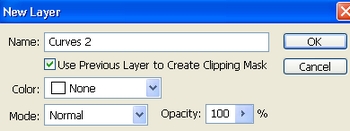
    Create a new Curves layer with Clipping Mask. By this way this Curves layer just affects selected part:


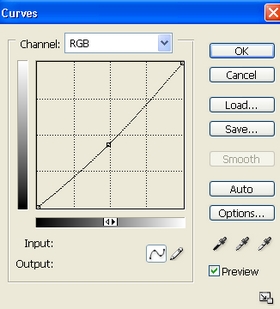
    Down RGB curve a bit to reduce light:
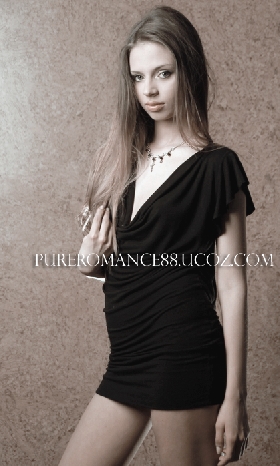
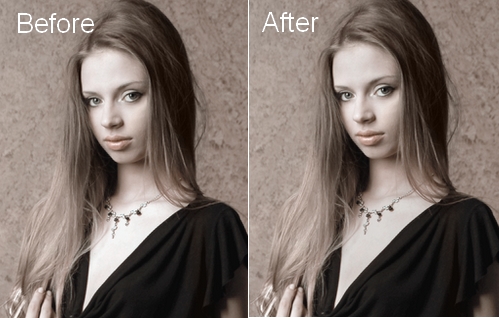
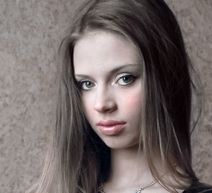
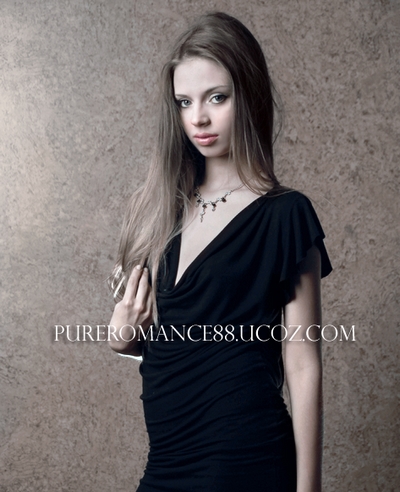
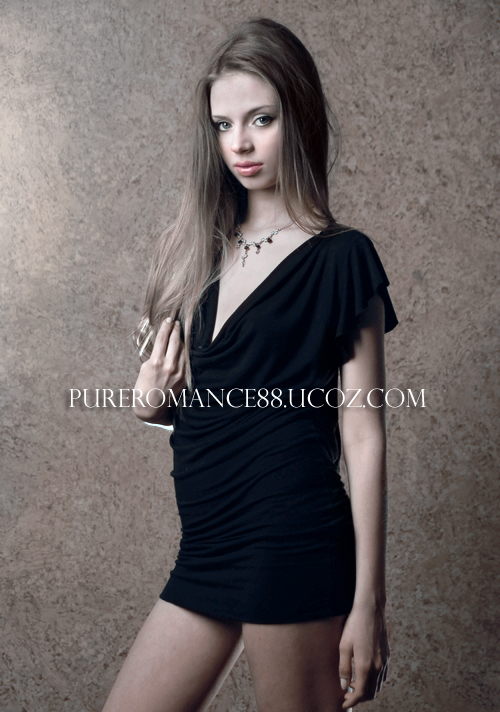
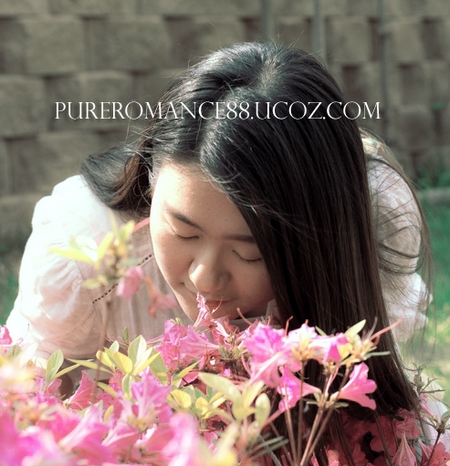


    Final Result:


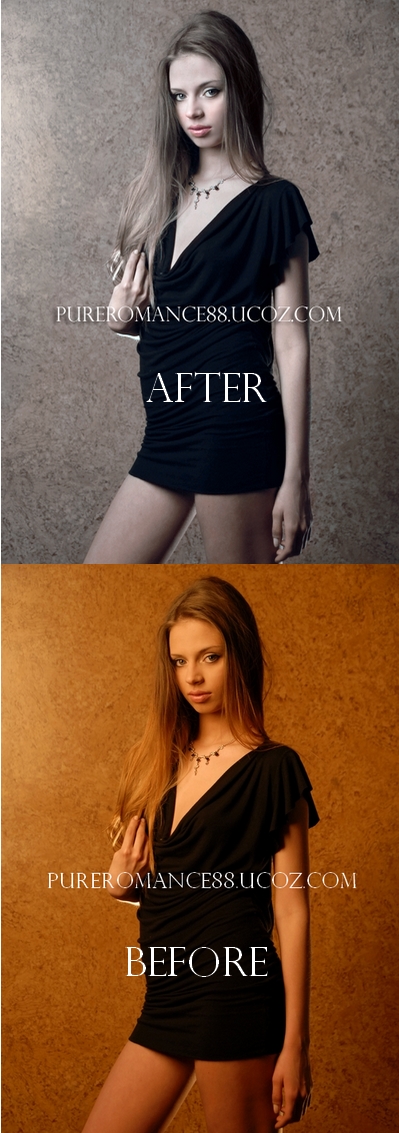
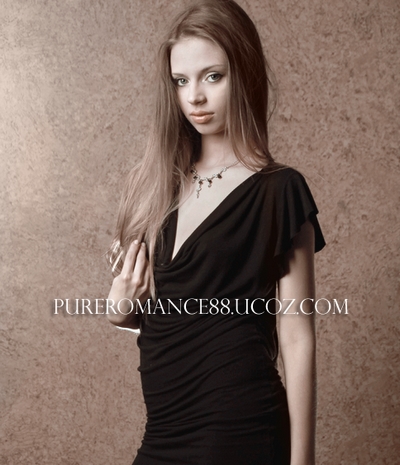
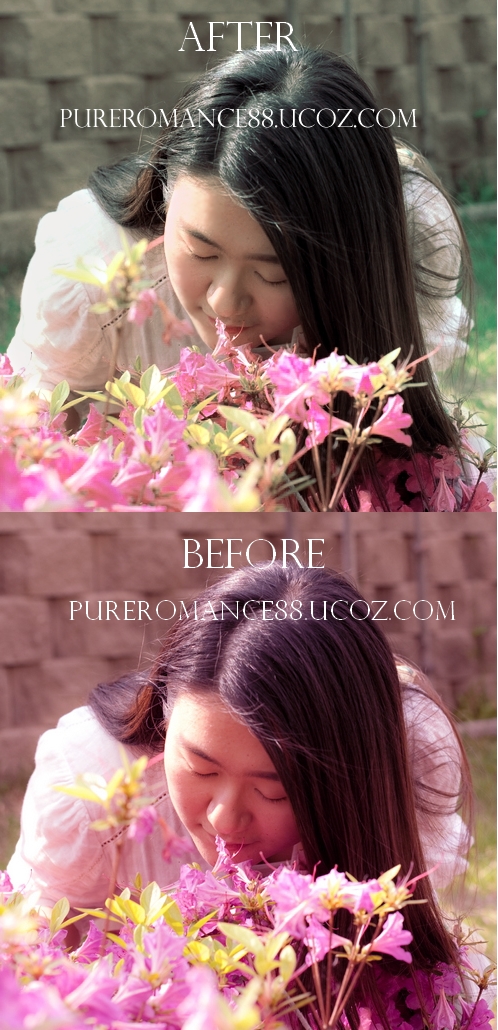
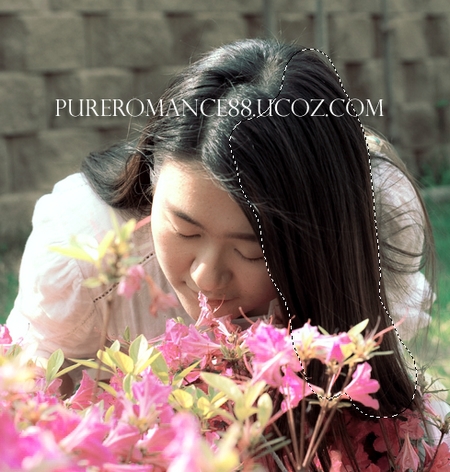
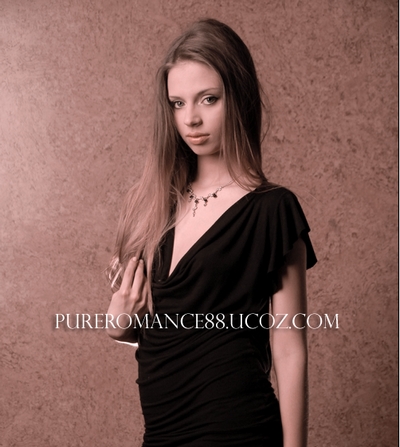
    II. Retouch photo with magenta cast:


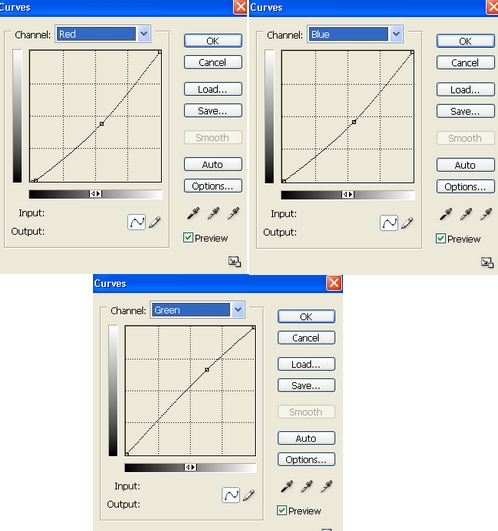
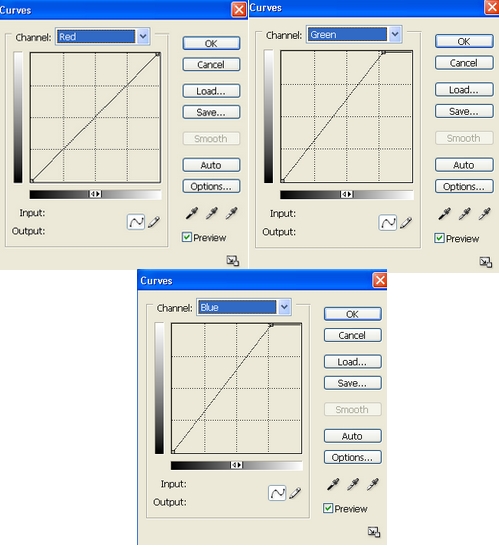
    1. Open your stock. As you see the whole picture  i use has magenta cast. So i use a new Curves layer : move Red down and Green up  to increase green tone, also make Blue down to bring out yellow tone for background and decrease magenta tone on whole picture. 


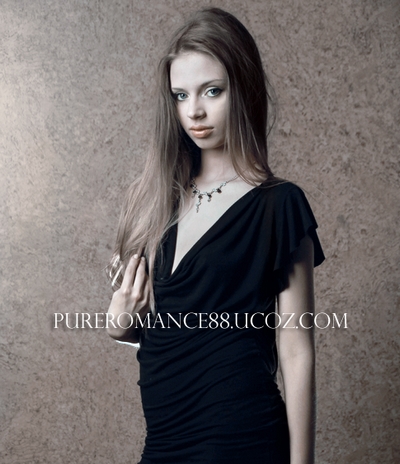
    You can notice lots of difference after this step:


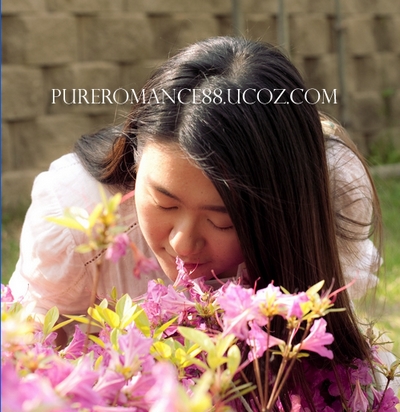
    2. Create two new Selective Colors. This step is to reduce magenta tone again on whole picture, especially magenta and yellow on model skin, also change yellow tone on background ( wall behind model) into neutral:
    Reds: -9, -22, -3, -19
    Yellows: 81, 31, -49, 0
    Magentas: -100, -42, 100, 0
    Whites: 16, -17, -36, 0

    Reds: 22, -7, 6, 0
    Yellows: -27, 8, -16, 0
    Magentas: 100, 100, 0, 59
    Whites: 12, 22, 0, 0
    Neutrals: 4, 0, 0, 0

    If your picture does not have white tone you should not adjust Whites channels.


    3. Create 3 new adjustment layers. This step is to make model skin look better also continue decreasing magenta on foreground, skin and clothes of model:
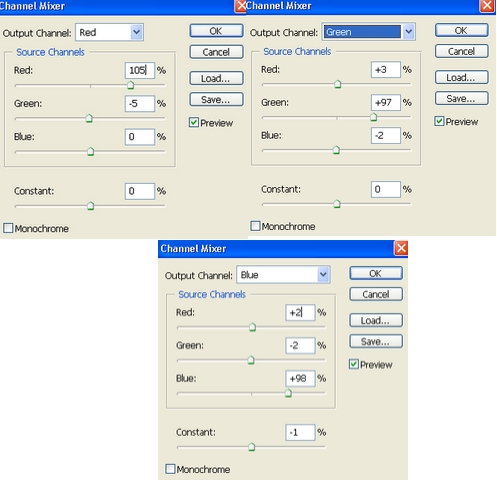
    Channel Mixer:


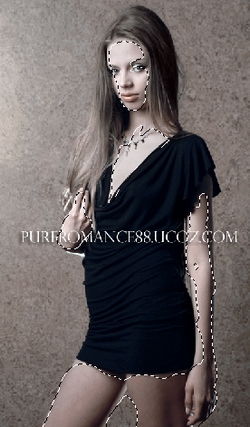
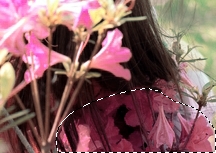
    Use soft black brush to erase foreground of picture to keep vivid color of flowers:


    Color Balance:
    Midtones: -5, -11, -7
    Shadows: -6, -5, -3

    Selective Color:
    Reds: -18, -16, -15, 15
    Yellows: -5, -8, -7, 0
    Magentas: 0, 100, 100, 0
    Whites: -29, 8, 13, 0
    Neutrals: 5, 0, 0, 0
      Use soft black brush to erase background behind model on layer mask of Selective color to remove cyan cast.


    4. In this step i increase contrast for picture by using Brightness/Contrast layer:


    Use soft black brush to remove contrast on hair:


    5. Like in tutorial above, we will use soft brush on different layers to retouch model, background, foreground part. 

    New layer, use brush with  color #fe7ede  to paint on flower on right part of picture to make their color fit another flower on foreground. Set this layer to Color 20%:


    Another layer with Multipy mode 40%, use soft brush with   
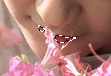
color #ffbfbf to paint on face parts that are overexposed:


    New layer with Multipy mode 50%. Select brush with color #fd83ab  to paint on lips:


    New layer with Color mode 10%. Use soft brush with same color for lips to paint on cheeks:


    New layer with Multipy mode 40%. Use brush with color #e1d6d4  to paint on model clothes that is overexposed:


    6. New layer and grab Blur tool with same settings in previous tutorial. Paint on face to soften mode skin:
    This step is optional.
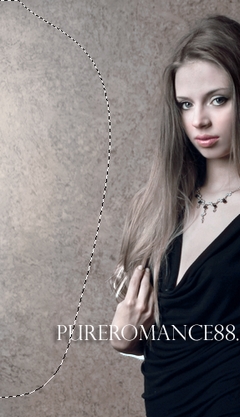
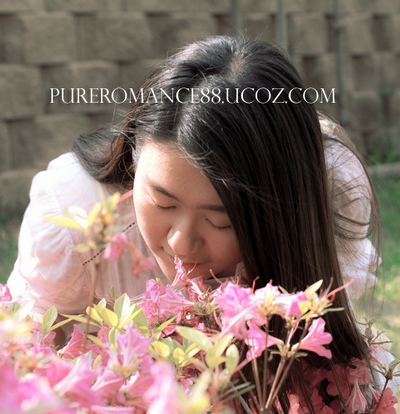

    Final Result:

    Views: 48627 | Added by: Admin | Tags: color, Photo effect, photoshop, cast, Effect, Beauty, Photo retouch, Photoshop tutorial, Portrait

    ABOUT ME: I'm Jenny and i live in Hanoi, Vietnam. If you like what i write or want to keep in touch with me, you can subscribe to My blog, email me or like My Facebook page to keep updates of my latest works.

    Please ask before you want to post or translate my tutorials on other sites. I hardly decline if you ask nicely. Thank you :).

    Share
    Share |
    Total opinions: 28
    0   Spam
    1 Nicole   (2011-05-28 8:52 PM) [Entry]
    wow very good tips and instruction. Thanks so much! happy

    Link with http is no
    0   Spam
    2 Gregor   (2011-05-29 10:10 AM) [Entry]
    Hey ya
    I would like to thank you for this tutorial. It helps me a lot! Keep up the great work! Regards.

    Link with http is no
    0   Spam
    3 Admin   (2011-05-30 9:46 PM) [Entry]
    Thanks for supportive feedbacks guys tongue wink

    Link with http is no
    0   Spam
    4 Rajesh   (2011-05-31 11:53 AM) [Entry]
    Very nice and helpful. thank you

    Link with http is no
    0   Spam
    6 Admin   (2011-06-01 2:42 PM) [Entry]
    you're welcome wink

    Link with http is no
    0   Spam
    5 shil   (2011-05-31 3:49 PM) [Entry]
    really helpfull, thanks...... i have lots of photos, which i have taken in bulb light (tungsten)... it helps me to make it normal... THANKS happy

    Link with http is no
    0   Spam
    7 Admin   (2011-06-01 2:43 PM) [Entry]
    im very pleased to know it, thanks! biggrin wink

    Link with http is no
    0   Spam
    8 avinash   (2011-06-03 1:03 PM) [Entry]
    excelent tongue

    Link with http is no
    0   Spam
    9 Admin   (2011-06-03 9:04 PM) [Entry]
    Thanks avinash wink . Welcome to my site wink

    Link with http is no
    0   Spam
    10 Jack   (2011-06-06 4:29 PM) [Entry]
    Well explained, I believe it will be helpful for many who comes across your website, Your blog stands separate because you explain the things very well...Wonderful blog you have

    ---------------------------------------
    http://www.deepetch.com
    Clipping path service and more...

    Link with http is no
    0   Spam
    11 Admin   (2011-06-08 9:50 PM) [Entry]
    Thanks Jack biggrin . Im always pleased to hear from you as well as your kindness. Your words are always welcomed and expected. wink . Thank you again and wish you everything best wink

    Link with http is no
    0   Spam
    12 Jessy   (2011-08-09 11:40 PM) [Entry]
    awesome...really helpful tutorials...Thanks so much!

    Link with http is no
    0   Spam
    13 Admin   (2011-08-19 10:59 PM) [Entry]
    no problem...my pleasure! wink

    Link with http is no
    0   Spam
    14 Soumyajit Banerjee   (2011-09-03 12:18 PM) [Entry]
    It's helpful. Thank you. awesome.. smile

    Link with http is no
    0   Spam
    15 Admin   (2011-09-03 11:02 PM) [Entry]
    no problem, im glad to hear it wink

    Link with http is no
    0   Spam
    16 Nabeel Altamash   (2011-09-08 3:02 PM) [Entry]
    OOOOOMyGod.........Its awesome happy biggrin

    Link with http is no
    0   Spam
    17 Admin   (2011-09-20 6:05 PM) [Entry]
    Thanks Nabeel biggrin . Glad to hear from you again wink

    Link with http is no
    0   Spam
    18 Nabeel Altamash   (2011-10-02 10:07 PM) [Entry]
    & one more thing Jenny i have been now selected as a student in graphic designing school in communication design at Karachi School Of Arts in Pakistan.... smile
    & tomorrow is ma 1st class.......

    Link with http is no
    0   Spam
    19 Admin   (2011-10-04 6:29 PM) [Entry]
    wow it sounds great Nabeel! congrats my friend ;). Wish you lots of luck and success in your study and your everything wink

    Link with http is no
    0   Spam
    20 Nabeel Altamash   (2011-10-11 10:00 PM) [Entry]
    Thnx 4 such a great kindness.................... wink

    Link with http is no
    0   Spam
    21 Admin   (2011-10-26 5:16 PM) [Entry]
    you're most welcome wink

    Link with http is no
    0   Spam
    22 Admin   (2012-03-12 2:04 PM) [Entry]
    thanks biggrin

    Link with http is no
    0   Spam
    23 QuyVu   (2012-05-10 8:51 PM) [Entry]
    Excellent work..:)

    Link with http is no
    0   Spam
    24 Admin   (2012-05-14 5:11 PM) [Entry]
    Hi,
    I'm just a photoshop lover and i've written tutorials from my own exepriences after learning and practicing tongue :). Thank you for stopping by and leaving comments :).

    Link with http is no
    0   Spam
    25 Webdesign Belgium   (2012-06-14 3:22 PM) [Entry]
    Wonderful Design Blogs, Such a great list. Thanks for sharing all these blogs all are very useful to every one

    Link with http is no
    0   Spam
    26 Admin   (2012-07-05 10:10 PM) [Entry]
    thank you, i'm glad you thought so tongue wink

    Link with http is no
    0   Spam
    27 abhay   (2014-10-15 8:26 PM) [Entry]
    Wow........u r amazing.... so deeply & well explained

    Link with http is no
    0  
    28 Admin   (2014-11-01 8:51 PM) [Entry]
    thanks, i'm glad to hear it tongue

    Link with http is no
    t allowed due to spams. Thanks for your understanding.

    Name *:
    Email:
    Subscription:
    Code *:

    Copyright MyCorp © 2024
    Free web hostinguCoz
    ?if()?>?endif?>2s5164>-->Log out