Cyan tone in photoshop - 26 March 2010 - Poetry, Writings, Art, Design
Thursday, 2012-05-17, 8:38 AM

Creativity comes from simplifying

Main | Registration | Login
Welcome Guest
RSS
MY TUTORIALS ON OTHER SITES
  • Create an emotional sunset photo manipulation

  • Create a cat in a magical pond scene photo manipulation

  • Create a surreal photo manipulation Coffee Mind

  • Create a Fantasy floating park photo manipulation

  • Twisting Water-Surreal photo manipulation

  • Firing Heart-Emotional photo manipulation

  • Create a dramatic building explosion scene

  • Let me sink-Emotional rainy scene photo manipulation

  • Create a colorful and furistic photo manipulation

  • The Sky Station - Surreal photo manipulation

  • The Vampire Hunter - Dark photo manipulation

  • Dark storm scene photo manipulation

  • The Released - Dark and surreal photo manipulation

  • Wounded rose - Create an abstract photo manipulation

  • Create a dark and emotional photo manipulation

  • Create a dramatic battle scene in photoshop

  • The Forgotten - Dark an conceptual photo manipulation

  • Night's butterfly-Create a dark and mysterious fantasy portrait

  • Create an anti-smoking concept design in photoshop

  • A dreamy world-Create a fantasy landscape

  • Create a dramatic action scene poster

  • Create a nature inspired, out of bound photo effect in photoshop

  • Cool metal text effect

  • Dance in blue - Fantasy photo manipulation

  • Emotional night scene - Photo manipulation

  • Create a lovely 3D like butterfly in Photoshop

  • Create a beautiful Valentine background with moon and heart

  • Create a beautiful and romantic Valentine wallpaper

  • Beautiful pink flower portrait

  • Create a beautiful spring greeting card in photoshop

  • Beautiful spring-Fantasy photo manipulation

  • Cool floral 3D text effect

  • Colorful bokeh heart effect

  • Retro artistic effects

  • Sexy ghost in the uninhabited house-Dark photo manipulation

  • Colorful and glamour composition style in photoshop

  • Glowing text in colorful fantastic space scene

  • Magical blossom dance-Fantasy photo manipulation

  • RECENT TALKS


    TAGS
    Bokeh wallpaper spring pattern Photo manipulation Snow glowing images Heart Text effect Design model Surreal GHost girl room Pink Emotional frame Photo effect season Nature Random thoughts vibrant color Memory abstract My story Beautiful girl Asadal special effect drawing Creative Strength Hurt sparkling painting valentine background colorful Winter red Mood Effect rose Fantasy Misc Blood summer Sky missing graphics Penelope Cruz Feeling romantic Portrait photoshop FLY gif My poetry green flower photo Splatter Wind Beauty Dreamy Autumn dark photos Life music Calligraphy yellow Photo retouch Soft glitter Skin vector Beautiful script BANNER Rain icon font Patter NIGHT Mandy Moore Inspiration Woman Photoshop tutorial love Forest light Blend Fonts butterfly Blue Sweet Stock
    ARCHIEVES
    SEARCH


    RECENT POSTS
    [2012-03-07]
    Create a Nature themed, Astract photo manipulation
    [2011-10-29]
    The Mirror - Dark and horror photo manipulation
    [2011-07-30]
    Color blending collection IV
    [2011-06-20]
    Give your ordinary portrait photo glamorous effect with charming make-up
    [2011-06-14]
    Create a burning girl with fire effect
    MOST POPULAR
    [2010-07-26]
    Complete portrait retouching
    Views: 42686
    [2010-11-26]
    The enchanted forest- Fantasy photo manipulation
    Views: 39680
    [2011-01-31]
    Create beautiful glowing flowers
    Views: 35291
    [2011-01-15]
    Color blending collection 3
    Views: 34515
    [2010-08-22]
    Color blending collection I
    Views: 29821
    [2010-10-27]
    Create a model look with naturally perfect skin
    Views: 27797
    [2010-05-29]
    Enhance portrait photo with natural look
    Views: 27345
    [2010-11-15]
    25 beautiful dreamy effect photoshop tutorials
    Views: 26575
    [2010-09-14]
    Soft and dreamy movie effect
    Views: 25959
    [2010-03-15]
    Beautify a portrait
    Views: 25452
    MOST TALKED
    [2010-11-26]
    The enchanted forest- Fantasy photo manipulation
    Opinions : 77
    [2011-01-31]
    Create beautiful glowing flowers
    Opinions : 62
    [2010-12-06]
    The Winter Queen - Fantasy photo manipulation
    Opinions : 42
    [2010-03-15]
    Beautify a portrait
    Opinions : 40
    [2010-10-10]
    Create a beautiful emotional black and white love scene
    Opinions : 38
    [2010-07-06]
    Create beautiful golden skin effect using three different ways
    Opinions : 37
    [2010-08-22]
    Color blending collection I
    Opinions : 36
    [2010-12-15]
    Sweet red 3D love text effect
    Opinions : 35
    [2010-07-21]
    Vibrant and glamourous retouching
    Opinions : 34
    [2011-01-15]
    Color blending collection 3
    Opinions : 32
    RANDOM POSTS
    [2010-02-20]
    Blend and retouch a dark photo
    [2010-07-06]
    Create beautiful golden skin effect using three different ways
    [2010-02-26]
    Silken petals
    [2010-11-15]
    25 beautiful dreamy effect photoshop tutorials
    [2010-07-21]
    Vibrant and glamourous retouching
    MY FAVORITE SITES
  • PSD Tutsplus
  • FanExtra network
  • Webmaster tutorials
  • Typography resources
  • STATISTICS

    Total online: 1
    Guests: 1
    Users: 0
    Main » 2010 » March » 26 » Cyan tone in photoshop


    10:30 PM
    Cyan tone in photoshop
    Cyan is a very nice tone and it gives romantic look for your picture background . In this tutorial i will tell you some basic techniques to get that tone .

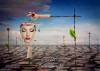
    We will use this stock:
     

    1. Use RGB Channel:
    1a. Duplicate your base. Choose Channel, choose Green, Ctrl+A. Then Ctrl+C to copy it. Choose Blue, then Ctrl+V to paste into. Choose RGB and then come back to layer pallet. We can see the change of color from yellow into light cyan. We need to strengthen the tone.


    1b. New selective color.  We will see the result of these two ways, and depending on your pic tone you can adjust parameters. I just adjust difference of Cyan channel and let see the different results:
    - Red:-45,-18,0,0
     Cyan: 100,-36,-100,0
     White:-30,-39,-23,0
    Neutral:12,0,-26,0.
    Black:100,100,100,0.


    - Red:-45,-18,0,0
     Cyan: 100,100,-64,0
     White:-30,-39,-23,0
    Neutral:12,0,-26,0.
    Black:100,100,100,0.


    2. Use Channel mixer:
    2a. After duplicating your base, create new channel mixer layer:
    Red:139,8,-22,-10
    Green:6,105,15,0
    Blue:0,146,0,-6


    2b. New selective color to strengthen the tone:
    Cyan:100,100,0,0
    Blue:100,0,0,0
    Black:100,100,100,0


    Or: Color balance ( to compare the effect)
    Midtones:-33,0,10
    Shadows:2,-4,12


    3. Use Lab color:
    3a. Choose Mode-Lab color. Then duplicate your base. Choose channels, choose a channel then Ctrl+A and Ctrl+C. Then choose b channel and Ctrl+V. Choose Lab channel and then choose layer pallet. We have result:


    Remember we cant save jpg format in lab color so we have to change color mode to RGB to save as jpg .

    We need to brighten up the light on model.
    Use lasso tool to create a selection around her.


    Ctrl+L to adjust levels:
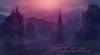


    And here is result:


    Views: 18130 | Added by: Admin | Tags: Photo retouch, Photoshop tutorial

    ABOUT ME: I'm Jenny and i live in Hanoi, Vietnam. If you like what i write or want to keep in touch with me, you can subscribe to My blog, email me or become my friends on Facebook to keep updates of my latest works.

    If you like this post, pls share it! Thank you!

    Share
    Share |
    Total opinions: 23
    0  
    1 U-guy222   (2010-03-28 9:55 AM)
    Very useful tutorial. Thanks.

    0  
    2 Kristen   (2010-03-28 9:33 PM)
    Very easy but nice effect. I did not think of it before.

    0  
    3 Admin   (2010-03-28 10:46 PM)
    Thank you U-guy222 and Kristen hello smile

    0  
    4 Phantom   (2010-03-29 3:07 PM)
    Odlican tutorial!

    0  
    5 Admin   (2010-03-29 11:01 PM)
    Thank you Phantom , you are welcome smile

    0  
    6 no name   (2010-03-30 2:53 AM)
    It' s wonderful!
    ... the first picture is wonderfull too!!!

    0  
    7 Admin   (2010-03-30 6:32 PM)
    The model is beautiful of course, i like to use beauty photo to make graphics biggrin tongue

    0  
    8 Haider Ali   (2010-04-02 6:36 PM)
    the model is so cute........, i like to sue beauty phototo make new one...... smile

    0  
    9 Admin   (2010-04-02 9:37 PM)
    @8: you meant to use my stock to make your own graphic? can you show me your result ( link it from here) okay?

    0  
    10 WE ROCK   (2010-04-08 1:15 PM)
    The shade of yellow determines the meaning. Pure, bright and sunny yellow is the easiest color to see. People who are blind to other colors can usually see yellow. Yellow is full of creative and intellectual energy. Always use yellow note pads.Yellow symbolizes wisdom. Yellow means joy and happiness. People of high intellect favor yellow. Yellow daffodils are a symbol of unrequited love. Sunday's color is yellow-gold. Like the energy of a bright sunny day, yellow brings clarity and awareness. The shade of yellow determines its effect: Yellow-green can mean deceit, and creates a disoriented feeling. Orange-yellow imparts a sense of establishment. Clean light yellow clears the mind, making it active and alert. Carry or wear yellow gemstones to promote the ability to express yourself. They are excellent stones for writers and public speakers to increase eloquence. The yellow stones stimulate movement and mental awareness. They are used to enhance decision making skills.
    cool

    0  
    11 shabnam   (2010-05-07 4:38 PM)

    0  
    12 Mai   (2010-05-11 11:04 AM)
    . Use Lab color:
    3a. Choose Mode-Lab color. Then duplicate your base. Choose channels, choose a channel then Ctrl+A and Ctrl+C. Then choose b channel and Ctrl+V. Choose Lab channel and then choose layer pallet. We have result:
    i'm lost here.. mode lab? channel b?

    0  
    13 Admin   (2010-05-11 3:15 PM)
    After duplicating your pic, then from Menu, choose Image-Mode then you will see some color modes to choose :RGB color, CMYK, Lab color, MultiChanel...lets choose Lab color. Then an annoucement will appear to ask you :Flatten image before mode changes? let choose Don't flatten. See on layer pallete, click Channels you can see Lab, Lightness, a, b. Choose channel a, press Ctrl+A to select it, then Ctrl+C to copy. Then click on channel b, press Ctrl+V to paste selected channel ( channel a) to b channel. Then click Channel Lab ( from channel pallete) you can see the result.

    0  
    14 Muqaddas   (2010-05-15 2:28 PM)
    Wow Just love this thanks 4 the tutorial...
    Hey Sis Admin thats ur pic in ur dp??

    0  
    15 Admin   (2010-05-15 3:29 PM)
    u meant the pic of tutorial or my profile?

    0  
    16 clippingimages   (2010-05-16 1:27 PM)
    Wow!!!!!!! great.thanks for sharing............

    0  
    17 noone   (2010-05-17 10:27 PM)
    wow this dude completely ruins the original photo ...

    0  
    18 Brian Schmitt   (2010-05-21 1:39 AM)
    The tutorial looks neat, I just need some screen /dialog boxes to follow along

    0  
    19 Admin   (2010-05-21 3:58 PM)
    Brian, if you are not sure about something, you can ask me smile

    0  
    20 shabnam yasmin   (2010-06-22 4:50 PM)
    I really like your tutorials...... flower

    0  
    21 Admin   (2010-06-22 10:08 PM)
    Thank you shabnam, so kind of you wink

    0  
    22 Victor   (2011-08-11 11:30 PM)
    hey m nt really able 2 doo it ..... sad sad sad
    can u plzz temme in detail hw too do it surprised surprised
    wud b sooomch thnkfull to u !!!!

    0  
    23 Admin   (2011-08-20 0:02 AM)
    which step did not you understand?

    Something you should read before leaving your words:

    1. Pls use English or Vietnamese only which i can understand. Comments with another languages will be deleted.

    2. Pls be kind. You can say your own thinkings, opinions, ideas even negative ones, but i don't accept the rudeness or if you lack the respect to me and my readers.
    3. Pls don't use only emoticons or one word "hi" to represent your voice. All of such comments will be deleted. If you really want to say something, why don't leave more impressions?
    4. No spam, advertisement ( cheap host, back link...) or stuffs that are not relevant to me or my blog content. Comments are always pre-moderated so the spams will not get any chances to be published.
    5. Pls don't ask if they are not relevant to my blog content ( for example: ask me to help to do an effect on another site). I've been so busy so hard to follow such requests.
    6. Html code for comment board is disabled. So pls don't use it here. But if you want to leave the link of your site here, just do it with prefix http://. For example http://www.google.com. Is it simple, isn't it ?
    And now, have fun!


    Name *:
    Email:
    Code *:
    Copyright MyCorp © 2012
    Free web hosting - uCoz
    ?if()?>